72 Hr Kit - Evacuation Grab Bag

It seems like there has been one disaster after the other lately: wildfires, an earthquake in virginia and now a hurricane along the East Coast.

As I was following the coverage of Hurricane Irene, Mayor Michael Bloomberg ordered more than 270,000 people to evacuate their homes before the storm was to came.

270,000 people!

That is a lot of people to tell to just up and move. I wonder how many of them are prepared for such an event? Do they have somewhere to go? Some way to keep in contact with their families? Or a plan to take their valuable things with them?

These are all very important things to think about. Fortunately they have a couple of days to prepare, but what would happen if you were only given a few hours, or less?


One thing that could dramatically lower your stress level is if every member of your family had an evacuation kit they could each grab in case of an emergency. That way you wouldn't be running around like a chicken with its head cut off trying to find everything that was running through your head and worrying about what you might be forgetting.

This is called a grab bag. It is actually a smaller part of your disasters supply kit. But it is the part that can be "grabbed" quickly in case of evacuation.

It doesn't have to be a bag. It could be a large, covered trash container, a five-gallon bucket, or a suitcase on wheels. I think it makes more sense for it to be a camping backpack. They have more space, are made for carrying long distances and have waterproof fabric or layers that could be useful if you had to be outdoors.

Some basic supplies that should be included in your grab bag are:

  • ID tags on the bags-containing emergency contact information and numbers, medical info, current medications and reasons why they are being used and any allergies, especially to antibiotics. (For example: I am allergic to penicillin which is an antibiotic so in case someone found me unconscious and I had an infection, they would know that I would need a different kind of antibiotic) 
  • Copies of important documents- will, deed, marriage license, birth certificate, health insurance ect
  • Extra keys to your house and cars
  • Change of warm clothes, sturdy shoes, rain gear and a warm hat like a beanie
  • Food- ready to eat or requiring minimal preparation and water 
  • Manual can opener and other cooking supplies (I've heard at shelters that sometimes they will hand out canned food that don't have the pop-top lids or utensils and plates. So you want to make sure that you can make use of what you are given.
  • Water- 1 gallon per person per day (this gets kind of heavy, I put in probably a gallon and 1/2 and then pack our cars with extra.) Water purification tablets are lightweight and a good thing to have but you aren't guaranteed to have water accessible.

  • First Aid Kit and manual- I went to an healthy woman event put on by a local hospital and at one of the display booths they were handing out these nifty little first aid kits that are the perfect size for our grab bags and car kits. I even keep one in my diaper bag. 
  • Prescription medications
  • Personal hygiene items- ie. toilet paper, feminine supplies, hand sanitizer or soap, toothbrush/paste
  • Tools- Flashlight, batteries, pocket knife,  heavy work gloves, dusk mask, whistle, map of the area, battery operated radio (obviously some of these don't need to be in everyone's bag but definately if they are old enough to operate or use them, they should have them. This would be a good reason to teach your kids how to read a map and also for you to have a designated meeting place that they will know where to go to.)
  • Permanent marker, paper, duct tape and current photos of family members and pets for re-identification purposes
  • Disposable camera
  • Sleeping Bag or blanket
  • Money- cash in small denominations and quarters for phone calls (if you can find a pay phone anymore)
  • Extra prescription eye glasses, contacts, hearing aids or other personal items
  • Special needs items-  for children, seniors, disabled people or pets
In addition to your grab bags, you should make a 'grab list'. These are all the things you would want to take with you if you had time and room to bring them with you. What are the things you would want to have with you if you were never able to come back? 

For me that would be my scrapbooks, family histories and genealogy, family keepsakes and jewelry, ect. These are also the first things I would grab out of my house if it was on fire after I made sure my family was safe.

One last thing. 

The last thing you would want to worry about was having to stop in a huge line of other unprepared people filling up their cars on their way out of town. Always keep your car's gas take half full. 

I am horrible at this, but I have a new goal to be better.

I would love to hear of any ideas you may have or of items I have missed that would be a great addition to my grab bags. 


Cooking From Your Garden - Lowfat Version of Peaches n Cream


I never thought the day would come when I would be getting cooking tips from my little sister. But she can grill kebabs to perfection and she is the one who came up with this little gem I am going to share with you today.

One of the things I love most about summer is the abundance of delicious fruit.

Strawberries and peaches are my favorite and there is nothing I love more than Peaches and Cream.

However, like most yummy desserts, this one is usually full of sugar and fat.

Then, enter my little sister.

I was over at my parents house while she was there with a friend. She was chopping up strawberries in such a way  I knew it could only be intended for one thing. Strawberries and Cream.

So of course I offered my services to eat any she may have left over. But then she told me she was making a low-fat alternative to strawberries and cream. And adding yogurt to them.

"Eeww no thanks" I said feeling like she was about to ruin one of my comfort food staples.

But then my curiosity got the better of me and I tried a bite.

 Divine! It was so good.

So of course I had to come home and share it with you.

Here is my low-fat version of Peaches n Cream


Chop up a peach. You don't want the pieces too big. Cut them small enough to have 2-3 in one spoonful. That way they will be covered all over better with the 'cream sauce'.

Spoon 1-2 Tbls per peach of vanilla yogurt into a bowl. This is what makes it creamy and sweet. Don't use unflavored yogurt. You would just have to add sweetener anyway to make it taste good.

Pour about 1/4 cup of milk per peach into the same bowl. Stir to combine. 


Add in your peaches, give 'em a good stir to coat and dig in!

Thanks to my sister for coming up with this idea! I thought it was too good not to share. She also uses it for blueberries and raspberries. So give it a try with your favorite type of fruit.

Let me know what you think.

Using Your Food Storage - Bulgar Wheat

The number one question people have regarding long-term food storage is "what do I do with it?"

This is bulgar wheat

Bulgar is one of the earliest forms of processed wheat. It originates from the Middle East and is still used prevalently over there. 

Bulgar wheat is made by soaking, cooking, drying then crushing wheat kernels into small pieces. It is not cracked wheat. That is something else. 

Bulgar looks kind of like couscous but has the same nutritive value as whole wheat. 

It has 151 calories, 0g of fat, 34g of carbs, 8g of fiber and 6 grams of protein in every cup. It is also rich in B-vitamins, phosphorous, maganese, iron and calcium as well as a good source of folic acid which is essential for women to have while pregnant.

Bulgar is a perfect long-term food storage item due to its high nutritional benefits and easy storage and preparation. Since it is already precooked, bulgur can be cooked like rice or soaked in water and eaten cold making it an easy food to eat if you are without power. 

One of the biggest problems people have with their food storage is not knowing what to do with it once they need it. They buy a big bucket of wheat and hope they will never need it or plan to figure out what to do with it when the time comes. That is a big mistake.

In an emergency situation, stress is already going to be high and it would only add to it trying to figure out how to make dinner for your family with unknown ingredients. Also, if you start now, you can add your food storage items to foods you already eat to incorporate them smoothly into your diet. Some people especially children find it hard on their systems to start eating a lot of whole grains if they aren't used to it. So unlike other grains in your food storage, bulgar is easier to digest because it is already precooked. It also resists mold contamination and insect attacks as well as does not absorb radiation.

Bulgar wheat is nutty tasting and extremely versatile. It is usually used like rice or pasta but can be used in breads, salads, casseroles, stew, desserts or served as a side dish. It is also great as a meat extender or meat substitute in vegetarian dishes.


Today I used it in my Sloppy Joes.

I just made my regular Sloppy Joe recipe but put in an equal amount of ground beef to cooked bulgar. It turned out awesome. This is one of my favorite things. And in fact I was kind of in a hurry so I just dumped in a bottle of my canned ground beef so I didn't even have to worry about chopping onions or cooking and draining the ground beef first. It was super fast.


First Aid Kit

My First Aid Kit     

If there is an emergency/ disaster in your area, chances are high that your emergency response resources are going to be overwhelmed and you will have to fend for yourself. Preparing for that likelihood is a great idea.


Take a First Aid and CPR class-I think this would be the most helpful thing you could do in your first aid preparedness. Not only will you be able to preform under pressure with confidence but you will be able to handle your family's everyday emergencies too. I just found out that my city offers free CPR and First Aid Certification to its residents. I am definitely going to take advantage of this resource. Contact your local fire department and ask if they have anything similar.

Knowing how to care for injuries is one thing but you need to have the supplies on hand to do so as well.

Here are some ideas that you might want to include.

First Aid Kit
Sterile adhesive bandages in assorted sizes
2-inch and 4-inch sterile gauze pads (4-6 each)
Hypo-allergenic adhesive tape
40-inch triangular bandages (3 rolls)
2-inch and 3-inch sterile roller bandages (3 rolls)
Scissors and tweezers
Epi pen- if allergic to bee stings
Sewing needles or sewing kit
Moistened towelettes/wet wipes
Antiseptic soap
Antiseptic solution- iodine compounds
Antibiotic ointment (neosporin)
Thermometer
Tongue depressors (2)
Tube of vaseline or lubricant
Safety pins in assorted sizes
Cleaning agent/soap
Latex gloves (2 pairs)- non latex too in case of allergies- it will be extremely important to create a fluid barrier between you and any victims you might help treat especially if they are outside of your family.
Sunscreen
Insect repellent
Caladryl or generic equivalent
First Aid manual
Rubbing alcohol
Cotton balls
Heavy string
Splinting material
Prescription medications- with a schedule of names, dosage amounts and frequency. (one of the problems facing aid workers in Japan right now is that the tsunami victims don't remember the names or dosage amounts of their prescription drugs)
Non-prescription drugs
Aspirin and non-aspirin pain reliever
Anti-diarrhea medication
Antacid (for stomach upset)
Laxative
Iodine pills- taking iodine pills can help prevent the absorption of radiation so in the event of a nuclear disaster (terrorism, war or like Japan's nuclear power plants) you can take those to help keep your family safe
Activated charcoal (use if advised by the Poison Control Center)

The biggest first aid injury you will probably face will be bleeding. Knowing how to stop or slow major bleeding is probably the most beneficial thing you could learn.
On a very basic level, if someone is bleeding profusely you can try to control it using these methods:

  • bandage the injury very tightly (not tourniquet tight though).
  • if they bleed through that bandage, wrap around another one
  • if still bleeding, elevate injury above the heart
  • if elevation doesn't help, put pressure on the nearest pressure point. (There are pressure pints located under the knee, inside thigh/groin area, right above the bicep in the arm pit, ect)
  • If none of these work then use a tourniquet. A tourniquet is your last option. Once you put it on you can't take it off and they will most likely end up losing that limb. At this point though it would be preferable to lose the limb because if you don't stop the bleeding they will have lost so much blood that they will end up dying without the tourniquet.
Well on that happy note, I'd love to hear of some things you think are essentials to have if your first aid kit. 

And, remember to make smaller versions of this kit to go in every car and each family member's disaster supplies grab bag if they need to evacuate.

Charcoal - Fuel Storage

I picked up these bags of Charcoal BOGO for $7.50 

Charcoal is a perfect emergency preparedness fuel to store. It will keep for a very long time and is one of the least expensive options that a family can store per BTU. (British Thermal Unit- a way of measuring thermal energy.) My family has a gas grill that we plan on using in an emergency situation. But if we run out of gas or something happens to the grill during the disaster, charcoal will be a nice backup fuel.


When storing charcoal you will want to dump it out of the paper bags it comes in and store it in an airtight container because it has a tendency of absorbing moisture. I've seen a lot of people use metal garbage cans. The metal lid on the garbage can could come in handy too as a place to start your charcoals if you didn't have a grill. (You would then place them into whatever you were going to use to bake in. More on that in another post.)

The nice thing about charcoal is that there isn't too much estimating when it comes to cooking temperatures and times from your normal recipes. Each charcoal briquette supplies about 40 degrees of temperature. So if you needed to back something at 400 degrees you would use 10 briquettes. If you needed 325 degrees you would use about 8.

Charcoal is great because the coals stay hot for a long time and if you bury them you could always have a starter so you wouldn't need to waste your matches.

Although charcoal emits almost no smoke do not be led into thinking that you could use them for indoor heating. When charcoal burns it requires a ton of oxygen which helping it produce huge amounts of carbon monoxide which can be deadly in an enclosed area.

Tips:

*You can make your own charcoal from wood
*Charcoal can be used to purify water
*You may want to store lighter fluid or newspaper to help in ignite it later.
* Don't place charcoal on cement to cook, it will make your concrete crack
* Stock up for great prices at the end of summer sales


Provident Living Spotlight- What To Do With Left-Over Rice

Rice and Raisins
You are all in for a treat. 

I am about to share the yummiest breakfast recipe in the whole world. It is warm, chewy and sweet. Total comfort food. And it is super fast to make.

My mom would make this for us whenever she had too much left-over rice. 

I make too much left-over rice just so I can make this the next day. 

If you have ever had rice pudding, it is like that, only for breakfast. Who wouldn't love dessert for breakfast? Yum! I can't wait.

Grab your left over rice. 4-5 cups is best. It is just right for the amount of evaporated milk you get in 1 can but you can make it with any amount by just decreasing the milk. I had 5 cups so that is what I used. Dump it in a stock pot or large sauce pan.

Turn your stove on medium-low. Open a can of evaporated milk and dump it over your rice. You can use regular milk here if you want but the evaporated milk justs adds better flavor and creaminess.


Stir your rice and milk mixture. The rice will start absorbing the milk. You just want to heat everything through, nothing needs to cook. As you can see there isn't a lot of standing liquid. You want the rice to get thick. Like the consistency of porridge. 

Next, add some brown sugar. I use dark brown, the flavor is better. Scoop about 1 Tbls per cup of rice. If you want it sweeter you can always add more to taste. Remember that the raisins will add some sweetness too so you won't want to add too much. Stir. The rice should start looking a little golden. 

Add 1/2 tsp-1 tsp cinnamon. I usually end up right around 3/4tsp. Stir.

Now you can either add 1/3-1/2 cup of raisins to the mixture and heat through. Or if you have picky eaters you can have each person sprinkle however many they want on top of their own serving. Or none. I like to have about 1 raisin per bite. That way you have all the textures and flavors together. 

This is a great way to use the raisins that are left at the bottom of a bag. You know the ones that are a little dried out and no longer look appealing.

K, are you drooling yet?

 Just pour a little regular milk over everything, like how you would eat oatmeal, before digging in. For some reason I like the warm rice and raisins with the cold milk taste. 

Enjoy! 

If for some reason you don't devour the whole pan for breakfast and you happen to have left-overs, it is great straight out of the fridge too.

If you were living exclusively off your food storage can you imagine how tired you would be of oatmeal? This would be a nice little treat for everyone just to change things up a little. Plus, rice is a lot easier for little bodies to digest than most grains.

Personal Information Sheet


There is a city in my state that has instituted the Vial of Life program with the mission of making their citizens and city more disaster resilient. One of the free resources offered is a personal information sheet you can fill out that lists personal info, emergency contacts, medical information and history as well as medications currently being taken along with the reasons and dosages needed.

I think this sheet would be great for everyone to fill out and its nice that you only have to fill in the blanks instead of coming up with all the information yourself. This would be useful to stick in your disaster supplies grab bag or even have at home particularly for those who are homebound, living alone, or with special medical needs, in a place where it can be easily located by 911 responders in the event of an emergency. having this information available could help save your life.

You can print the sheet here.


Tips for completing the personal information sheet:
The back of the sheet can be used when extra space is needed to complete any section.  Place an
asterisk (*) in the appropriate section to draw attention to the back of the sheet.

Personal Information:
Complete as thoroughly as possible.
If more space is needed, place an asterisk (*) in the section to refer the reader to the back of the form.
Medical History:
Check off any medical conditions you have or may have had.  If you would like to provide specifi c
information on a condition, use an asterisk (*) instead of a check mark, then elaborate in the “Other
Medical Problems...” section, or on the backside of the form.
If you have suffered a stroke, “related defi cit” refers to any impairment now suffered as a result (for
example, weakness on left side).
Also list any allergies to medications or check “none” if there are no known allergies.
Medications Taken:
Note the location where medications are stored (for example, bathroom medicine cabinet).
List all prescription and non-prescription drugs currently being taken.
As an alternative to handwriting this section, call your pharmacist or physician for a printout of current
medications and attach the printout to the information sheet.
REMEMBER, update this section as prescriptions change!
Other Emergency Information / Instructions:
Use this section to record any other pertinent information which might be useful to 911 responders.

If you'd like to check out the rest of the site click here.

Emergency Sources of Water

Water = Life

If you were only able to store one thing for emergency preparedness it should be water.

The human body can only survive a little while without water. It could be only a few hours to a few days depending on the conditions and physical activity of the person. With just water but no food a person can last weeks.

The general rule of thumb is one gallon of water per person per day. Pregnant and nursing women, children and ill people require more. So take the amount of days you want to be prepared for times by the number of people you are planing for. Keep in mind that this is the bare minimum. That means there will just be water for drinking and cooking, none for cleaning and washing or sanitation.

 I think you should aim for at least 1 week but strongly recommend  2 weeks. Storing water beyond that become unpractical so you should have a plan for obtaining and purifying water from your home an surroundings.

Although you shouldn't rely on these exclusively as your water storage there are actually quite a few hidden sources of water in and around your house you could tap into if you found during a disaster that you went through your water supply too quickly or that help wasn't coming after 2 weeks.

Melted ice cubes or juice from cans of fruit and vegetable
Pipes: If water has been interrpted to your house, turn off the main water valve. Turn on a faucet from the highest level of the house to let in air and save the water that comes out from the lowest faucet.
Water heaters: These should be drained periodically to release any accumulated sediment so the full capacity of water is available. Turn off the electricity and gas to the water heater. Open the drain at the bottom, turn off the water intake valve and turn on a hot water faucet.
Waterbeds: This water is good for washing, not drinking (the plastic is treated with pesticides to inhibit algae). Do not use bleach to purify this water
Back of toilet: (unless cleaners are used in the back) This water needs to be purified before use. Do not use water from the bowl of the toilet.
Streams, rivers, running water, ponds and lakes: These need to be purified before use
Groundwater: Dig a hole ina damp or muddy area. soak a cloth in the mud and wring out the water into a container. purify before use
Natural springs
Rainwater: purfiy befoe use.

3-6 Month Cash Emergency Fund

If you have saved $1000 in an emergency fund and paid off all your debt except for your house using the debt snowball, then you are ready to move onto Dave Ramsey's Baby Step 3. 

This babystep is fairly straight forward. You want to pile up cash for 3-6 months worth of expenses. Remember, this is an emergency fund so you only need to count your necessary expenses. Utilities, Food, Mortgage etc. You probably wouldn't be worried about paying for cable if you were in a tight enough situation that you were using this fund.

Keep this money were it is liquid or very accessible. That means a money market or bank accounts. Do not use this money for investing. This money needs to be there when you need it.

There are a few factors to consider when deciding whether to do save 6 months of expenses instead of 3. 
  • Are you self-employed? (lean towards 6 months)
  • Is your income irregular? (lean towards 6 months)
  • How is the current job market? Right now with unemployment so high I would rather 6 months of expenses covered in case of job loss.
  • How is the economy in general? Does it seem stable? ie inflation vs. deflation, short food supply
  • What are some of the political plans being talked about? ie raising taxes, stimulus plans
For me, I'm more comfortable having cash for 6 months of expenses saved up, but anything is better than nothing. 

How are you feeling about the outlook of the economy right now? How many months are you going to aim for?

Home Hazard Hunt

When I was at an emergency preparedness night recently one of the speakers spoke about having a home hazard hunt where you and your family go through the entire house and look for potential dangers. I think this would be a fun activity to do with your kids now that they are out of school for the summer.

Surprisingly there are quite a few things to check for to prevent injuries and fires etc.

Check for Electrical Hazards:
*Repair or replace damaged cords and plugs
*Remove cords under rungs or over nails, pipes or heaters
*Use one plug per outlet, don't string surge protectors together
*Put covers on outlets or electrical boxes (especially if you have young kids. My husband bought a ton of electrical outlet covers when we moved into our new house but then we found out that we have plastic spring loaded electrical outlets which act the same as outlet covers. If you bought a new house in the last few years you may have them too. They make it a pain to plug cords into though.)
*Repair/ replace appliances that spark, smoke or overheat

Check for Chemical Hazards:
*Store flammable chemicals in approved containers and in a well-ventilated place outside your home
*Store oily rags in covered metal containers
*Limit quantities of household chemicals and store out of reach of children
*Separate reactive chemicals such as bleach and ammonia

Check for Fire Hazards
*Eliminate combustibles (yard waste, papers, rags, old mattresses)
*Separate heat sources (appliances, candles, portable heaters, etc) and combustibles
*keep chimneys, flue pipes, vents and vent connectors clean and in good repair
Keep portable heaters in low traffic areas

Safety Equipment:
*Install a smoke alarm in each sleeping room, hallway and level of your home. Test monthly and replace batteries yearly
*Install carbon monoxide alarms on each level of your home
*Store and learn to use your ABC fire extinguisher
*Remember PASS

  • Pull the trigger
  • Aim the nozzle
  • Squeeze the trigger and
  • Sweep back and forth at the base of the fire


Secure large Items in Your Home
*Anchor water heaters, large appliances, tall or heavy furniture and pictures to studs in the wall
*Install a flexible gas line on gas appliances
*Store heavy objects on lower shelves, secure cabinet doors
*Avoid placing beds under windows or heavy objects (how many of us have shelves above our kids beds because they look good there? I know I wanted one there.)
*Brace overhead light fixtures or fans

Utilities
*Show responsible members of the family the location of utility shut-off valves and how to operate them (It would be a good idea to have the shut off wrench attached nearby).

A lot of these are things we had already done, but the hazards are especially good to be aware of.

My children aren't old enough for this yet but I think it would be fun to make a game out of it. Like talk about examples before hand then a few days later have a treasure hunt with prizes for finding the hazard and then fixing it.

If any of you have done this or plan to with your kids I'd like to hear how it went.

Opening 5 Gallon Buckets

I know you probably saw the title of the post and thought; Really? How hard is it to open a 5 gallon bucket? But until you have ever tried for 45 minutes to pry the lid off of one of these suckers you won't appreciate the tips I'm about to share.


Bulk grains usually come in 5 gallon buckets when you buy it for food storage. Food-grade 5 gallon buckets are great. They have an airtight seal and are hard and thick enough that rodents can't gnaw their way through.

That is great for long-term storage but makes it a pain for short-term storage.

I keep my flour in a 5 gallon bucket and use it to replenish my pantry container when it gets low. The only problem is that if it is the middle of the day and I run out of flour, I have to wait for my husband to get home from work to get it for me.

Now I will admit that I have never had very strong arm muscles. My arms fall asleep if I put my hand in a fist. So I'm sure there are a lot of people a lot stronger than I am but I literally cannot open a 5 gallon bucket by myself. If by some miracle I get the lid off, I haven't ever been able to get it back on. I'll stand/jump on the lid and think of anything I can to get it back on but it's impossible for me.

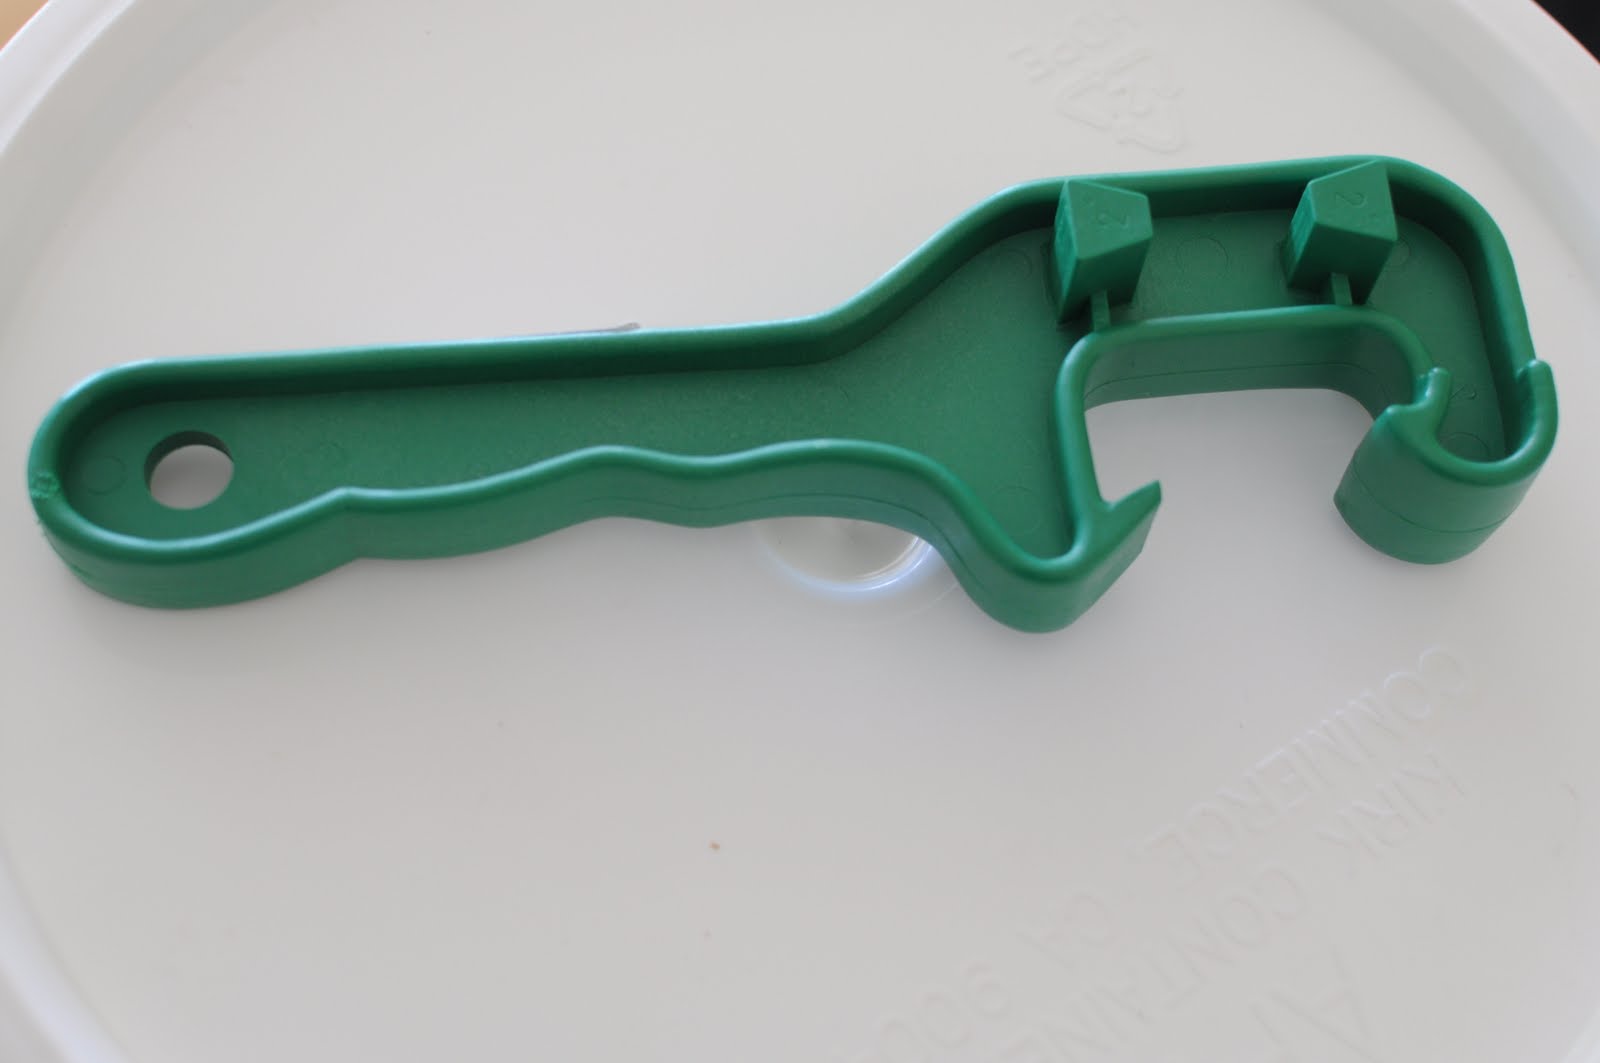
I was getting so frustrated with not being able to get my flour when I wanted it. Luckily, my church announced a group deal they were arranging where you could buy a bucket wrench/ lid opener. I'd never heard of it before but was sure glad to get one. I have since found them at Walmart for about $4 or you can get one online here


It is pretty handy. My husband used a flat-head screwdriver to help get off the lid before we got this. I definitely think this is great to have if you have long-term food in 5 gallon buckets but it doesn't solve my problem with getting the lid back on.

GAMMA SEAL LID  ____________________________________________________________


This is the coolest thing ever! It still maintains the airtight seal with the rubber gasket around the ring. But the center of the lid twists off easily, let me repeat, easily to access the food inside and twists right back on to close. 


Now these are obviously more expensive than regular lids but have made my life so much easier. I got mine for $7. My grocery stores carry them when they hold their case lot sales. You can also get them online here or a 6 pack of different colors here.

They also come in an assortment of colors so you can color code your food if you want. I decided to just get a few. I don't need them on every bucket. When I need to open a new bucket, I will take off the old lid and replace it with the gamma seal lid from my last empty bucket. That way I'm reusing the gamma seal lid over and over instead of being left with extras once my 5 gallon bucket is empty like I would if I got them for all of my buckets.

I love things like this and hope it helps you too.