How to Use a Pressure Cooker
I think I've decided that the pressure cooker/canner is one of the best inventions ever. You can take something that usually takes forever to cook and have it done in a fraction of the normal time. My mom had a pressure cooker but gave it away when I was little after a disaster in the kitchen. So I grew up always super nervous about these mysterious pressure cookers and horror stories that seemed to follow them.My sweet husband knew that I was getting interested in cooking more and wanting to try pressure cooking. So for Mother's Day last year he got me this pressure cooker.
It was a great idea. It is electric so it takes out a lot of the guess work and has built in safety features which make it pretty impossible to screw up. It is great for a first timer. You pretty much just push buttons and leave it alone until it beeps at you.
I thought it would be nice to do a step-by-step of the process to help you feel more comfortable with the idea and hopefully encourage you to want to try it.
Instructions
1.

Clean the cooking pot and put it inside the pressure cooker. The nice thing about this pressure cooker is that the inside pot is non-stick so it is super easy to clean up. It's like the inside bowl of a rice cooker if you have ever used one of those.
2.

Get the parts together for the lid. It comes with the outside lid, a rubber sealing ring (gasket), and a support cover for the sealing ring.
3.
Assemble the lid parts by looping the rubber ring around the support cover then pushing it through the rubber grommet (rubber piece in the middle) onto the lid.
4.

Dump your food inside. Today I am making black beans. They have already been rinsed and sorted. You can make so many things in a pressure cooker. Potatoes, artichokes, and meat roasts are all things I have tried and have been amazed at the amount of time it saves.
5.

Dump in your water. All recipes for pressure cookers will call for a little water. The steam is what builds the pressure inside and cooks the food at such a high temperature so quickly.
6.
Fit and twist the lid onto the cooker and add the pressure limit valve. Notice how the 2 dots line up? They need to. This is what controls the pressure. It doesn't lock into place. It just rests lightly because it needs to be able to move to release steam if the pressure gets too high. Also, this is where you manually release pressure when a recipe calls for the 'quick pressure release method'. I hold tongs and push the knob a little so I can stand far away from the hot steam that comes out.
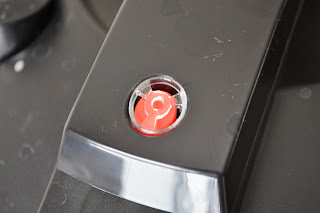
This red valve is the pressure indicator. It floats up to the top to let you know when there is pressure inside. Also, as long as the red float is up the machine will not let you unlock the lid or open it. This is one of the many safety features it has to prevent injuries.
7.
Now's the easy part. Select High Pressure from the menu button and type in the time for how long your recipe says the food needs to cook. Unsoaked beans need 30-35 minutes. I want mine breaking apart and soft so I did 35 minutes. Hit Start.
The pressure cooker will build up pressure and once it is reached, the time will start counting down. You just need to sit back and relax with a good book.
See how the red pressure indicator is up? This means there is pressure inside.
8. Look at your recipe and see if it needs the quick pressure release or normal pressure release method. The normal pressure release method is the easiest. Once the timer beeps letting you know the cook time is over, the machine will start to drop the pressure by itself.

You just need to wait until the red pressure indicator is down. This usually takes 20-30 minutes.
9.

10.
Your food is done! Check back next week and you'll see what I made these beans for. It's one of my favorite ways to make my food healthier.
I hope now that you know how easy pressure cooking is that you will give it a try.
Good Luck!


0 comments: