Showing posts with label Frugal Tips. Show all posts

All Natural Homemade Lavender Bath Salts w/ Essential Oil


I am always on the look out for nice, thoughtful, inexpensive gifts and I've got the perfect one for you today. Recently, I was invited to a summer garden party and needed to bring a hostess gift. Hostess gifts aren't supposed to be expensive, just something to show your appreciation for the invitation and effort that went into the event. Just something thoughtful you know your hostess would like.

When choosing a hostess gift, keep in mind the recipient and what they would like. This particular hostess is someone who loves flowers, especially roses and the smell of lavender. I also happen to know that she loves baths.

I could have run out and bought some fancy bath salts but have you ever read the back of a jar of bath salts you can buy at the store? They are full of hormone disrupting chemicals and synthetic ingredients that probably do more harm then good.

Luckily, we have the perfect diy natural lavender bath salts that any hostess would love.

We at Provident Princess love all things natural and non-toxic. This recipe for lavender bath salts is all goodness. First we have epsom salt which helps relieve sore muscles and joints with its magnesium and sulfate content. Second, it smell divine from the pure food grade essential oil which is made from the actual plant and not from some lab. And lastly, we add a little carrier oil which helps equally distribute the essential oil throughout the tub while also 'carrying' the oil into your skin so that it absorbs and really benefits from all the health benefits of the essential oil. And bonus, it acts as a moisturizer too after the bath so no extra lotion is needed.

The best part? Instead of spending $20 or more, this costs less than a dollar to make and has way better ingredient than anything you could find in a store.


Ingredients_______________________________________________________________________

  • 1 3/4 cup Epsom Salt
  • 1 Tbls Carrier Oil- I like coconut oil, but you can use olive oil 
  • 10 drops of Lavender Essential Oil- (I only use Doterra Oil, they have such quality ingredients and rigorous testing to make sure their oils live up to their high standards. You can find out more here). 
  • 1 Tbls of Fresh Lavender Flowers - if you don't have these it is fine, they just make the salts look pretty and show what its made of. Kind of like how you garnish a plate with things that are in a dish so you know what's in it. 


Directions________________________________________________________________________
It's really simple as can be.

  • Pour the Epsom Salt into a mixing bowl (glass or stainless steel- wood will absorb the oils)
  • Pour the Lavender Essential Oil drop by drop into the carrier oil and mix together with a spoon. 
  • Pour the combined oil over the salt and stir until it is equally distributed and the salt looks like wet sand. 
  • Stir in the lavender flowers through out.
  • Transfer into whatever glass storage container you would like. Do not use plastic. 

Enjoy your self or use as a gift.

Here's a few pics from the tea party, wasn't it gorgeous?


It was the perfect way to spend a summer's evening chatting with friends and sipping mint julep. I loved how the Lavender Bath Salts fit right into the garden theme. Especially, since I had picked the lavender from my own garden.


To learn more about Essential Oils see my post on Essential Oils 101

Naturally Dyed Easter Eggs


Those of you who have been following me for a while know that I am not a fan of all the dyes, fillers and engineered ingredients that are allowed in our food these days. For that reason, I am so excited to share with you a few ways you can dye food cheaply and naturally.

There are a lot of recipes of different ways to naturally dye eggs but some of them are ridiculously expensive. One recipe calls for 3 cups of blueberries! Even if I got the blueberries on sale for $1.50 for 6 oz, there is no way I am going to spend $4.50 to for just one color of dye. Or using half a cabbage. I don't like wasting things either. Although that does make an amazing deep blue color...

So I rummaged around in my cupboards and found a few things that are inexpensive and all natural.


Obviously you want to start with boiled, then cooled eggs. My mom swears that her 5-5-5 recipe results in perfect eggs every time. Place eggs in pot and cover with cold water. Bring to a low boil and boil for 5 minutes. Take off heat and let sit in hot water for 5 minutes. Dump out hot water and fill pan with ice/ very cold water for 5 minutes. Perfect color of yellow with no gray line. And easy to remove shells. You're welcome.

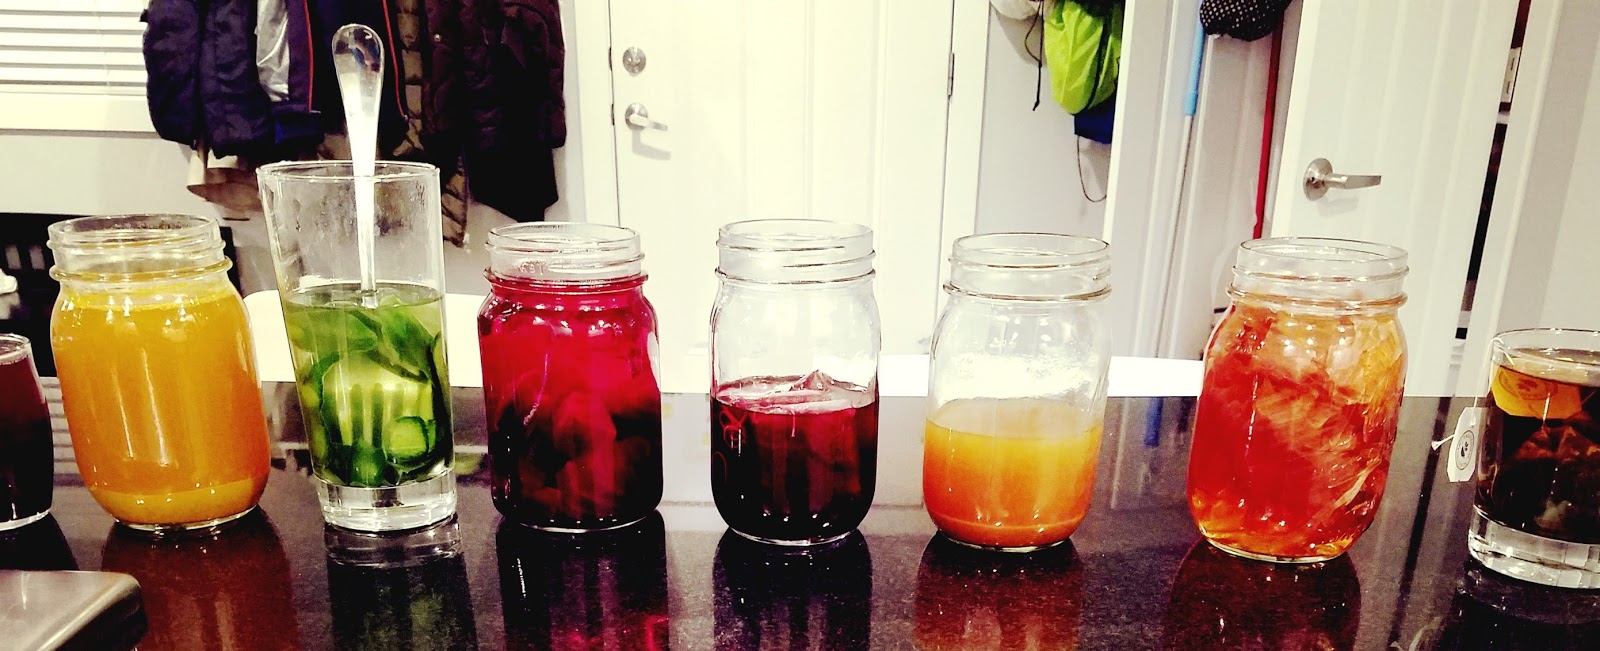
I wanted to try all kinds of colors. There were some I knew would work, but others were experiments. Green is a hard color. You can make green using spinach but I didn't want to use 2 cups of chopped spinach or boil it for 20 minutes. So I thought maybe I would try cucumber peel. It didn't work. My recipes are the easiest and fastest. I just put all my ingredients in canning jars and pour boiling water on top and let them steep until they cool (30-40 minutes). I strain them, add 1 Tbls of white vinegar and plop in a hard-boiled egg.

Blueberries, Tumeric, Cucumber Skins, Beets, Hibiscus Tea, Paprika, Onion Skins and Nettle Leaf Tea
Colors
Pink- Luckily, I had some roasted beets in the fridge to make Borscht with. So I used one of those. After it had colored the water and strained it, I stuck the chopped pieces back in the fridge for my Borscht. They were still tasty and had plenty of flavor. That's also why I wait to put the vinegar in until after it is strained.
Yellow- 1 Tbsp Turmeric
Green- I used a yellow turmeric egg then put in the blueberry mixture for 1 hour. It might not look green when you pull it out but wait for it to dry. It's a pretty sea foam green color. Or for a bright green, steep 2 cups chopped spinach in boiling water.
Blue- So I had smaller glass cups and thought it would be fun to try the blueberries. I just grabbed 1/4 c frozen blue and blackberries from a Costco fruit medley bag so it turned out to be pretty inexpensive.
Black- 3 bags of Hibiscus Tea. This one was surprising, I was thinking it would turn red like the tea but the eggs actually turned black.
Tan- 1 Tbsp Smoked Paprika. This one was fainter than I hoped. But it still worked ok.
Orange- Onion skins from 3 onions. Just crunch them up and put in the canning jar with boiled water
Brown- 3 bags of Nettle Leaf Tea. I was hoping this might turn green too but it turned more brown.
Purple- Dye one egg in the beets first, then switch to blueberry color for 30 minutes.


Designs-  House plants are perfect for using for making designes. I just used leaves from Piece Ivy, some blades of my Cordyline Indivisa, rubber bands, and the top of a strawberry. You can also use a white crayon to draw patterns with as well. I used some scrap pieces of cheesecloth to hold the leaves tight against the eggs and secured with twist ties.


I did these late at night. I tried 1 egg in the beets and 1 in the turmeric for about 30 minutes. They are the 2 on the bottom left. You can see the turmeric worked really well in that length of time and the beets turned it a light pink. I was tired so I filled the rest of my jars with eggs and stuck them outside. You can stick them in the fridge overnight but mine was full and luckily temps were like 36F. I like to use the egg carton to rest the drying eggs on.

L to R- Paprika, Beet (30min), Turmeric (30min), Turmeric (all night), Blueberry, Beets (all night), Beet and Blueberry mix, Hibiscus Tea, Nettle Leaf Tea, Onion Skins.

It's so fun to see how they all turned out. Didn't those designs turn out so fun? I love the strawberry top. The kids loved waking up and pulling the eggs out of the solutions to see how they changed. I love that this is a fun, inexpensive and all natural way to dye eggs. Let me know in the comments which ones are your favorites and if you plan to naturally dye your Easter Eggs too.

PP

How to Afford Healthy Food on a Budget Part 2


I had so much to say on my last post about how to afford healthy food on a budget that I had to split it into 2 posts. There are just so many ideas to help you save money but still be able to eat the kind of food we want too.

Homemade vs. Packaged
This one is huge. I think the biggest way to save money is to cook at home. It is also the healthiest because we can control what goes into our food so there isn't all the added salt, sugar, fat and preservatives that come in restaurant and prepackaged foods.

There are so many things that I could go into for this but lets just use one example. We love bread. My favorite bread is made by a company here in Utah called Prairie Grain Bread. The only ingredients are fresh stone ground wheat, water, salt, yeast and raisin juice concentrate. No preservatives, oil, eggs or dairy. It is delicious but it also costs $4.79 a loaf. I can make a loaf of organic bread for around $1 so that would save 3.80 a loaf. The average person eats 80 loafs a year x that by my family of 5 (not including the baby) and if I made my own bread all year I would save $1,520! That is a chunk of change that could really be spent on so many other things. Baking bread might not be your thing right now, but there are many things like that in your diet that you could make the switch from store-bought to homemade. Organic yogurt and bone broth, prepackaged salad or pancake mixes just to name a few.

Grow and Preserve Your Own Food
A subcategory of the homemade vs packaged cost savings is to actually grow and preserve your own food. You know I love preserving my own food. It is so satisfying to me and everything tastes so much better when you grow it in your own backyard. I can by a jar of organic spaghetti sauce for about 2 dollars. I can buy a whole organic tomato plant for about the same and over the course of the summer it would give me enough tomatoes to make at least 20 jars of tomato sauce! And let me put in a little plug for tomatoes being so easy to can. You could also freeze the jars if you don't want to can just yet. It is all about baby steps and slowly incorporating these cost saving things into your life.

Potatoes are pretty expensive if you want to buy them organic. But they are so easy to grow. You really don't even need a garden to grow them. You could grow them on a balcony or patio. I am going to be doing a post on that later in the spring to show you how easy it is so stay tuned. Once you have the potatoes, those are great things to shred and freeze to use later as hash browns. I love to put them in breakfast burritos to give a little more substance than just eggs.

Bulk up or Substitute Meat and Dairy
If you are trying to stay away from factory raised meat and dairy then pasture raised meat and dairy is going to be a huge expense in your food budget. One way I do this is by not using meat as a main dish. Very rarely do we every have chicken breasts or steak accompanied by sides. Instead, I try to use meat as a flavoring or accent to the main dish. Think chicken fajitas. There is definitely chicken in there but it is also surrounded by tons of onions, peppers, tomatoes, guacamole and beans and anything else I can think of to bulk it out and make them feel filling. The most common way I buy grass-fed beef is ground. That way I can put some in with chili made mostly with beans. Or use for tacos, but I will mix it half and half at least with refried beans. (that also makes it stick better to the taco shells while my kids are eating them). I like to add potatoes or other veggies to curry so it is not just chicken. This way we can still get the meat taste in our meals which is especially important to my husband, but it also makes the meals cost about 1/4 of what they would if we used meat in bigger portions. And it makes them more nutritious since we are getting more fiber and a variety of minerals and vitamins.

With dairy, it's kind of the same idea. I use it when we will taste it. Like drinking a glass of milk plain. But if I am cooking and it calls for milk, butter or eggs, there is no way I'm going to 'waste' my organic or pasture raised dairy in a recipe. I will use a plant-based milk and either chia or flax seed 'eggs'. These egg substitutes are awesome and so cheap compared to organic or pasture raised eggs.

I love having these little tricks to help keep our grocery budget down. That makes me feel more able to afford the more expensive items I like to include in our diet.

I hope these tips are helping and stay tuned for part 3. And here is part 1 if you missed it.


How to Afford Healthy Food on a Budget


Sometimes it seems like the only way to be able to afford healthy, organic food is to be rolling in the dough. But it's not. Sure, it would make it easier, but there are ways to afford feeding your family healthy food on a budget. I am going to share 4 of my most used tips on saving money on my food bill while buying nutritious food at the same time.

Buy in Season
Organic or Non-GMO food is expensive. There is no getting around that. But there are many ways to make it less expensive. The biggest way is to buy food when it is in season. I would suggest this even if it wasn't less expensive because food in season tastes better and is more nutritious than out of season food that has been sitting preserved in a warehouse for months or is being shipped halfway around the world.

I'm sure you know what I mean when I say that a fresh tomato bought in the summer has a completely different and richer flavor than one bought in the winter. Those ones are almost flavorless. Food that need to be preserved and sold at later times, either to keep markets stable or to always have available need to be picked earlier so they won't go bad. Food picked at the peek of ripeness have all the goodness of flavor and nutrients that are missing in out of season food.

Use Everything You Buy
Did you know that a recent study by the Natural Resources Defense Council found that Americans throw away almost $165 BILLION worth of food every year? That translates to about $2,200 for the average family of four. I don't know about you but that is a lot of money I'd rather spend on something else. There are so many ways to use everything you buy. Let's take mushrooms for example. When I use mushrooms in a recipe I will always either use the stems in what I am making or save them to mince up and put in our scrambled eggs for breakfast or in a meat dish the next day.

Fresh herbs are a big money waster. Usually you have to buy an already over-priced package of herbs for one recipe that won't even need the full amount. So you are left wondering what to do with the rest. Fresh herbs freeze wonderfully. I wrote an how-to post here with 3 different ways to do it.  Cilantro is an herb that we seem to use a lot in our house. Maybe because we are out west and enjoy a lot of Mexican food. There is a popular fresh-mex restaurant chain near us that makes the best Tomatillo Ranch Dressing. Ever. We like to make a homemade one from a copycat recipe that calls for 1/2 bunch of cilantro. But whenever I make the ranch, usually I am making their Cilantro Rice too. It calls for 1/2 a bunch of cilantro as well. So what do I do? I cut off the stems and use those to flavor the ranch. Since it all gets ground up you won't even notice, then I can use the pretty leaves in the rice. And, did you know that the most flavorful part of cilantro is the stems? Score. Plus I'll have some extra to use as garnish and the rest to throw in our eggs the next day. Sensing a pattern? I will usually use the little pieces of left-over, cut-up veggies in either our eggs or on a salad the next day. When I am spending money on organic food, I want to make sure none of it is being wasted.

Learn to Like Leftovers 
Ok, so I didn't know there were actually people out there who won't eat left-overs. ??? 

Apparently it's true. I don't understand it. I love leftovers. First, most things taste better when they have been left to sit and marinate over night. Second, it gives the cook (me) more time to do something else instead of preparing a meal every night. It is especially nice to have something already made when you know you are going to have a busy day/night and it's just one less thing to think about. Lastly, this is where you save a lot of money buy not throwing dollars down the sink. I just hate thinking about splurging on something only for it to be thrown in the trash. If you don't have enough for another full meal, keep reading below.

One last thought on this topic. I know that eating the same soup for lunch and dinner days on end is not fun. And food should be enjoyable I think. So if you always make enough for an army but your family doesn't make a dent in the amount you made, keep some to eat for a day or two, then portion out and freeze the rest for another time. (Most of the time they won't even realize it's leftovers that way.

Repurpose Your Leftovers
My husband always teases me because I save even the smallest amount of things. But I know it is worth it.  Especially because I have 2 small babies right now and they don't eat big portions. It's so nice to just take a little something that is already made, and that I know is good for them out of the fridge without having to make something special just for them to have a snack. Saves me a lot of time. Which I need with babies 15 months apart.

This also translates to old family members too. Say you splurged and got a grass-fed roast or some pastured chicken. Most likely you aren't going to have enough for another full meal of that so why not shred it up and use it in burritos with some sauted onions and peppers to bulk it up? Or cut up some bigger chunks for soup. Or stick it on a salad. Or sandwich. The options are endless. One of my kid's favorite 'meals' is a clean out the fridge night where they can eat anything they want out of the fridge that is already made.

I have a lot to say on this subject but the post was getting long. For more ideas how to afford to eat healthy food on a budget, check out Part 2 and Part 3. It will deal more with actually how to buy organic food for less.

Leave a comment below if you would like to see any specific recipes that I mentioned above or if you have any tricks you use to make your food budget stretch.


Getting Started with Canning


The idea of canning always seemed so intimidating. All I knew about it was that people used to do it in the ‘olden days’ when prepared food wasn’t so easily accessible or affordable.

I was always intrigued but too nervous to try to learn how to can because it seemed like a lot of things could go wrong if you didn’t know what you were doing. But then my husband and I moved into a neighborhood where I met someone who majored in Home Economics. Who knew that was even a college major? Finally, I felt I could learn from a master. That summer I tried my hand at pears, peaches, salsa, sugar-free apricot jam and grape juice. Wow! It’s amazing how much better food tastes when you grow and bottle it yourself. I loved that I knew exactly what was in my food. No weird additives or ingredients I can’t pronounce.

Now that I've learned more about the food industry and their questionable practices and 'ingredients' they put in our food, I am even more passionate about preserving and processing as much of my own food as I can.

The canning recipes I share here will use each canning item below. If you want to follow along, here is what you will need to become a master of your own home economics. 


JARS
Luckily, there are different degrees of canning. You don’t have to go straight to the pressure canner with no experience. I think it is easier to build up slowly using easy recipes before making the investment for intense canning supplies. In fact, there are certain things you can make where you don’t need anything else besides the jars.

There are many sizes of jars. 4 oz, half pint, pint, quart and gallons. Each are great for different things. Jam, tomatoes, meat, soup, juice. Then after you decide your jar size, there are 2 different size 'mouths' to choose from. Regular or Wide-mouth. That just means how big of an opening the jar has. If you are only going to buy one type, go with wide-mouth.

Personally, I like a variety for different things depending on what I'm canning. One great resource to look for if you don't want to order new ones is older women in your neighborhood who no longer can. I got boxes of jars when I mentioned I was just starting to can and was wondering if anyone had any jars they no longer used. That way you just have to buy new lids. You can also buy new lids and metal rings together if you want yours to look nice and shiny.

CANNING KIT
I didn’t actually have one of these the first few times I canned. And I can’t tell you how many times I burned myself by picking up the lids from steaming hot water with my bare fingers. These kits come with a magnetic wand that easily picks the lids up along with a jar lifter so you don’t burn yourself picking them out of boiling water, a wide mouth funnel to keep the jar mouths clean, jar wrench and kitchen tongs. I picked my setup from a regular grocery store on sale for about 10 bucks. 

WATER-BATH CANNER
A water-bath canner is used to process high acidic foods, like fruits and pickles, once the jars are filled. Processing is a necessary step to get all the air out of the jars to insure a good seal. Getting the air out of the food also controls bacteria, yeast and mold growth so your food won’t spoil. 

STEAMER
Some people use a steamer instead of a water-bath canner. The WSU Extension office however says research on steam canners has found that food canned in them is not heated to a temperature as high as when the same food is canned in a boiling water bath canner. The lower temperature results in less killing power of the bacteria, under processing and considered a risk of spoilage. Therefore the use of steam canners for home canning is NOT recommended.

PRESSURE CANNER
This is what I was most afraid of when I started canning. I could just envision the lid shooting up into the air and steam going everywhere because I had used the wrong pressure to can my foods. A pressure canner is what is used to process low-acid foods like vegetables, meat, fish and poultry. It is the only thing that can reach the higher temperatures (240-250°) needed to kill bacteria in low-acid foods. Boiling water in a water-bath or steam canner only reaches 212°. When you use a pressure canner, you have to make sure you get all the air out, use the right pound pressure and the right times for your foods. This is why I am saving it for last. The main thing to look for in a pressure canner is to make sure there is enough space for 1 level of quarts jars or 2 levels of pints stacked on top of each other. This canner is the best and is which one I got. It is definitely an investment but it is also one that will last forever because it has a metal to metal seal. 


OK, that's everything necessary to start canning, now all you need are some recipes. I'll be posting those as the summer goes so check back often!

In the meantime, let me know if you have any questions!