Essential Oil Series: Are Essential Oils Safe?

It's a common experience for someone to be so excited about their new oils that they want to use them for everything and on everyone but hold on there tiger, safety first. Just like the we love sunlight for its ability to help us synthesize Vitamin D, we are also very aware of the harm it can do from over exposure. Because oils are so effective and potent (which is why we love and use them), we really need to know how to use and not overuse them. 1-2 drops is enough, we don't need to dump on the whole bottle.

There are a few other points to consider to make your entry into essential oil life go more smoothly. I happen to know first-hand how being uneducated about oils can disrupt your journey into a more natural and healthy lifestyle. Let's just say I ended up with a burning, red face because I didn't know what a 'hot' oil was and that I should've have used it in a steam room. OUCH!

Lucky for you, you can be forewarned. Here are some common questions people ask.

Can I Put the Oils Anywhere?  ______________________________________________________

Normally if you are applying oil topically then we apply it to a targeted site on the body. But you should NEVER put oils directly into your eyes or your ears. The sensitive skin inside of your mouth might be more easily irritated by undiluted oils so be mindful of this before your first use. A good place to start is on the bottoms of the feet or along the spine until you know if you have any sensitivities to the oils. Speaking of dilution...

Why Should I Dilute My Oils? What is a Carrier Oil? ___________________________________

Essential oils are very potent so we only need to apply 1-2 drops to get the benefit it offers. One drop doesn't go very far when you try to rub it onto your body so we use a carrier oil that helps to “carry” our essential oil onto and into our skin. Our favorite is doTERRA’s fractionated coconut oil, but other options are olivie oil, avocado oil, jojoba oil, almond oil, cold pressed coconut oil, or any pure vegetable oil The benefits of using a carrier oil are:
-increases surface area of application 
-decreases your risk for sensitivities to the pure oils (especially important in babies)
-gives you a base to create your own blends by mixing your favorites together
-helps avoid wasting so much of your precious essential oil

What if I Get Some in My Eye? ______________________________________________________

My husband could tell you about this one. We know that oil and water do not mix so please do not try to wash off with water. It will only push the oil in deeper away from the water. You will want to create a larger area for the essential oil to disperse into; so rub ONLY a carrier oil over your eyes and face to dilute the essential oil back out of your precious eyes. Your vision might be a little blurred for a bit because of the carrier oil but it will be back to normal soon enough!

Which Oils Should I Avoid Using on Baby? __________________________________________

The National Alliance of Hollistic Aromatherapy lists these oils as irritating or caustic to the skin:

-cinnamon bark -clove bud -citronella -cumin -lemongrass -thyme -oregano -cassia-

There is so much overlap with different oils offering similar benefits, so it is a good idea to avoid applying these oils to young babies and using milder, gentler options. These oils can still be used confidently on ourselves, as long as we dilute them with a carrier oil of our choice. Test them on a small area your skin for your initial use. When you join our team, you get access to our private Facebook Community that is a wealth of knowledge to find the oils for the concerns you have.

Are Essential Oils Safe During Pregnancy and Breastfeeding? ____________________________

It is important to find a healthcare provider who is knowledgeable and will support you in the use of complementary and alternative medicine. As with any product, your midwife or physician should be aware of and approve your use of specific essential oils. The skin is much more sensitive and permeable during pregnancy, so be mindful of always diluting your oils well before application. Some oils that are good to avoid during pregnancy, even diluted, are clary sage, myrrh, and any blends containing these oils. These oils can promote uterine contractions and are best saved for use during actual labor, when delivery is intended. The safe use of oils during this beautiful time can be a natural and effective way to balance mood and reduce anxiety.

Should I Avoid the Sun After Applying Essential Oils? __________________________________

Yes and No. Certain oils can react with sunlight when applied to the skin and then exposed to direct UV rays. Make sure to always dilute these oils well, apply them to an area that is not exposed to the sun, or wait 24 hours before spending any amount of time soaking up its warmth! Oils that are considered phototoxic are: lemon, grapefruit, bergamot, lime, cumin, and any blends containing these.

Can I Use Essential Oils in the Bath? _________________________________________________

Absolutely! A bath is a great way to use your essential oils. But just like some of our other cautions, never add an oil that is 'hot', or caustic to skin in your bath water.  Always apply your oils to some kind of carrier before adding to your running water. I love epsom salt but vegetable glycerin or any shower gel/bubble bath that you already use and love, preferably unscented, can be used as well. A good amount to use as you learn your sensitivity levels would be 2-3 drops!

Can Essential Oils Counteract Prescription Medicine? __________________________________

Just like you should speak to your Dr. or Midwife about essential oil usage during pregnancy or breastfeeding; you should definitely consult your physician regarding any reactions that could occur, especially if the medication to which you are referring is vital to your livelihood. There are a couple that truly stand out, such as wintergreen oil being avoided by those taking blood thinners, and being mindful that tetracyclines can make the skin more sensitive to citrus oil + sunlight reaction. Most western medicine physicians will have limited knowledge when it comes to essential oils, so seeking out the opinion of a holistic doctor or registered aromatherapist is always encouraged. It never hurts to do a little research of your own as well.

All Set? Feeling confident to begin using essential oils? I hope so. Remember that one of the best benefits of joining our team is being connected to a huge community with so much knowledge and the resources to be successful in your natural wellness journey. Click HERE if you are ready to take the plunge into essential oils. And please leave me a comment if you have any specific questions.

Read the other installments of the Essential Oil Series.

Get Started


Hi! I am so glad you're ready to dive into essential oils and learn all the ways they can help you. I know it can feel really overwhelming to know where to start; but that's why I am here!

Alright, ready? Click HERE and make sure you have my number 184557 in the enroller field so you can be added to our team!

When you get started you'll have access to our private Facebook community as well as ongoing education, wellness consults, free products + gifts. But the best part of all? Friendship! We have loved connecting with like-minded friends + developing bonds to last a lifetime.


I recommend buying a discounted Starter kit and that includes Loyalty Rewards membership for free.

The Family Essentials Kit- $150

This beginner kit includes 10 core essential oils in 5 ml bottles with On Guard + Peppermint Beadlets. We covered these amazing 10 core oils in our Essential Oil Series.

The Home Essentials Kit- $275-

Our most popular kit! The Home Essentials has the 10 core essential oils you'll need to get going but in a 15ml size- so you get more bang for your buck. Also included is an essential oil diffuser which is a crucial and exciting tool to have for your essential oil usage!

The Natural Solutions Kit- $550

My FAVORTIE kit. This kit has all you need to get started with your core essential oils, some of my favorite mood oils, a diffuser, vitamins (doTERRA’s number one selling product) and much more! PLUS When you purchase this kit, if you order 100PV the next month you will receive 100PV($100) in free points! So loads and loads of free goodies with this one. It truly is the best value!

So now you’re ready to get going? Click HERE!

You’ll first fill our your information and THEN be picking your kit and oils! My Wellness advocate ID is #184557 – be sure that’s entered in so you can receive the benefits of our community!
Once you check out – email me providentprincess@yahoo.com for a free gift and access to our exclusive FB group!


GETTING STARTED FAQ _________________________________________________________

Do I have to order monthly?

Nope, you do not have to order monthly – or ever again should you not want to! We hope that through our FB community we can educate and inspire you in a way that you love using your essential oils. And, ordering them through the LRP system really is the best way to save lots of money and earn free shipping and extra products!

Do I have to sell a certain amount?

Absolutely not! Sharing essential oils is only an option. You do not have to share, meet quotas, sell a certain amount etc to enjoy your wholesale membership. If you do have a desire to build a business with us please select the Distributor option so we can best support and mentor you! Also be aware that you can always change your mind and change to a distributor later.

What is the Return Policy?

DoTERRA wants you to love your oils so they have a great return policy. You can read the return policy in detail here.

What If I don’t know how to use them?

That’s totally fine, that’s why we are here! As you join our community, you will receive welcome info, access to our exclusive Facebook member only group and a wellness consultation where we chat with you one on one about your needs. Please also search this website as there are a lot of tips on safety and oil usage.

We can’t wait to welcome you!!

Sour Cherry Lime Summer Mocktail


Here at Provident Princess we love enjoying seasonal foods and the easiest time to do that is definitely during summer with the abundance of crop varieties and farmers' markets popping up all over. Right now we are celebrating all things cherry. Summer always seems to include all sorts of fun drinks. And for all of you non-drinkers out there, I have the perfect Sour Cherry Lime Mocktail to share with you!  It is supper easy and like all recipes you will find here, this Cherry Lime Mocktail has the simplest and most whole ingredients. I'm not into a lot of fuss. When we buy food in season, the flavors don't need a lot of help to shine.

I was coming back from dropping one of my daughters off at a friends and I noticed a house with a beautiful cherry tree out back which didn't look touched or taken care of at all. So what did I do? I pulled over and knocked on their door of course. The nicest man answered and assured me that I was welcome to take as many cherries as I wanted.

Honestly, I know many people feel intimidated by knocking on a stranger's door asking if they are going to use their fruit; but most people are relieved to give it away. They are usually not the ones who planted the trees and don't really know what to do or can't use all the food it produces. Many people have acted like I was the one who was doing them a favor by taking it off their hands so they wouldn't have the mess to pick up later when it all fell unused to the ground. So if you ever have the chance, Do. It.

I showed back up later that day and we picked and picked and picked. It was so hot. We stuck with it until we had about 3 grocery bags half full and you couldn't even tell where on the tree we were picking because there were still so many cherries on there.

We got back home and were in for a huge surprise. The cherries weren't pie cherries like I had thought. They were Sour Cherries! Instead of the Cherry Pie filling I'd envisioned making for a decadent cheesecake, I had to think of how else to use this sour cherry harvest.

Have you seen that Cherry Juice Costco is sampling at Costco? They are touting it like it's the next pomegranate juice because of its high volume of anti-oxidants . It's made from this type of cherry! (And it is delicious btw, 2 thumbs up from the toddlers.)

Since the cherries are so tart, you can't really eat them plain, so we had to get to work washing and  pitting. My girls had a blast working the cherry pitter and really learned how to get in the groove.

So what can you do with sour cherries? They dehydrate wonderfully. Dried sour cherries at the store sell for 5.99/lb! That was by far our favorite method to eat these delicious cherries. We also made Sour Cherry Jam which I couldn't eat all the time but it is fun to have in the rotation. We also made Sour Cherry Syrup for pancakes and waffles.

I'm not a soda drinker. I've just never liked it, but my children and husband do. So every now and then I will buy some sparkling water to add to some juice to make it a little special. Sparkling water is so much better than soda. No sweeteners, added sodium or caffeine buzzes for the kids.

I had a box of La Croix Sparkling Lime Water left-over from one of these purchases and thought it would be the perfect vehicle to try our new Sour Cherry Syrup we canned. Let me tell you. This drink is like summer in a cup.


Ingredients________________________________________________________________________
3 (12 oz) cans of La Croix Sparkling Lime Water
3/4 cup Sour Cherry Syrup (you can find cherry syrup in the store too by the drink mixes if you don't               have your own homemade)
Slices of fresh limes and cucumbers for garnish (1-2 per glass)

Directions_________________________________________________________________________
Fill 4 Tumblers filled with cubed ice. In a pitcher combine sparkling lime water and cherry syrup. Add the cucumbers to the pitcher to start to infuse its flavor into the drink. You can leave it like this in the fridge until you are ready to serve. Stir to combine syrup and pour into tumblers of ice. Garnish with a lime slice and enjoy immediately.


Perfect for a summer evening spent outdoors.  I also like to garnish the serving platter with limes and sweet cherries so guests know what flavors to expect. I love how this recipe takes so little effort but really gives such an elevated look to any get-together.

Let me know in the comments if you try this recipe. And if you are looking for just a single drink for yourself to enjoy, 2 Tablespoons of the cherry syrup to 1/2 cup of sparkling lime water. You're Welcome.

Cheers,

PP

All Natural Homemade Lavender Bath Salts w/ Essential Oil


I am always on the look out for nice, thoughtful, inexpensive gifts and I've got the perfect one for you today. Recently, I was invited to a summer garden party and needed to bring a hostess gift. Hostess gifts aren't supposed to be expensive, just something to show your appreciation for the invitation and effort that went into the event. Just something thoughtful you know your hostess would like.

When choosing a hostess gift, keep in mind the recipient and what they would like. This particular hostess is someone who loves flowers, especially roses and the smell of lavender. I also happen to know that she loves baths.

I could have run out and bought some fancy bath salts but have you ever read the back of a jar of bath salts you can buy at the store? They are full of hormone disrupting chemicals and synthetic ingredients that probably do more harm then good.

Luckily, we have the perfect diy natural lavender bath salts that any hostess would love.

We at Provident Princess love all things natural and non-toxic. This recipe for lavender bath salts is all goodness. First we have epsom salt which helps relieve sore muscles and joints with its magnesium and sulfate content. Second, it smell divine from the pure food grade essential oil which is made from the actual plant and not from some lab. And lastly, we add a little carrier oil which helps equally distribute the essential oil throughout the tub while also 'carrying' the oil into your skin so that it absorbs and really benefits from all the health benefits of the essential oil. And bonus, it acts as a moisturizer too after the bath so no extra lotion is needed.

The best part? Instead of spending $20 or more, this costs less than a dollar to make and has way better ingredient than anything you could find in a store.


Ingredients_______________________________________________________________________

  • 1 3/4 cup Epsom Salt
  • 1 Tbls Carrier Oil- I like coconut oil, but you can use olive oil 
  • 10 drops of Lavender Essential Oil- (I only use Doterra Oil, they have such quality ingredients and rigorous testing to make sure their oils live up to their high standards. You can find out more here). 
  • 1 Tbls of Fresh Lavender Flowers - if you don't have these it is fine, they just make the salts look pretty and show what its made of. Kind of like how you garnish a plate with things that are in a dish so you know what's in it. 


Directions________________________________________________________________________
It's really simple as can be.

  • Pour the Epsom Salt into a mixing bowl (glass or stainless steel- wood will absorb the oils)
  • Pour the Lavender Essential Oil drop by drop into the carrier oil and mix together with a spoon. 
  • Pour the combined oil over the salt and stir until it is equally distributed and the salt looks like wet sand. 
  • Stir in the lavender flowers through out.
  • Transfer into whatever glass storage container you would like. Do not use plastic. 

Enjoy your self or use as a gift.

Here's a few pics from the tea party, wasn't it gorgeous?


It was the perfect way to spend a summer's evening chatting with friends and sipping mint julep. I loved how the Lavender Bath Salts fit right into the garden theme. Especially, since I had picked the lavender from my own garden.


To learn more about Essential Oils see my post on Essential Oils 101

Strawberry Chia Seed Freezer Jam

I am loving summer already. Yes, it's fun having the kids home from school and having tons of fun and crazy adventures; but what I am really excited about is my garden! I transplanted my strawberries last fall because they weren't doing great where they were and now they are producing abundantly. So in honor of my first strawberry harvest this season, I am so excited to share my favorite strawberry freezer jam recipe with you all.


It is so healthy. Made with low sugar and chia seeds for extra protein and fiber. It is delicious on toast. or my oldest loves it on waffles instead of syrup. I also mix it into plain whole milk yogurt for my babies.

This recipe is so fast and such an easy way to save money on organic jam. And if you have been interested in canning but didn’t know where to start, this is the perfect gateway into the world of canning and preserving. I know it can seem intimidating, but try this freezer jam recipe first. It is so easy and fast, and will be the perfect confidence builder to try one of the many other step-by-step recipes I have on the blog. 

Read on for my super easy, low sugar, Strawberry Chia Seed Freezer Jam and stay tuned on the blog for many more healthy, plant-based, low cost, real food recipes and ideas.

Strawberry Chia Seed Freezer Jam
Ingredients:
·        3 cups strawberries, chopped
·        ¼ cup non-gmo sugar or honey -(I know a lot of people love to use honey because of its health benefits but it isn’t worth it to use in this recipe. This recipe gets heated, just for a bit, but it is enough to kill any of the beneficial things in honey. So I use cane sugar and save my raw honey for when it will make a difference. It is non-gmo and way less expensive than raw honey.
·        2 Tbsp ground chia seeds- you can totally use chia seeds whole but I just don’t like the texture or look of all the seeds so I grind mine. About 1 ½ Tbsp chia seeds will make 2 Tbsp ground. Or just use 2 Tbsp whole.
·        1 Tbsp lemon juice- this helps retain color and texture
2 half pint canning jars

Directions     

1. Combine the sugar and ground chia seeds in a sauce pan and stir til equally distributed. (if you are using whole seeds don’t worry about adding them until you add the lemon at the end. With ground chia seeds it helps to add them to other dry ingredients or they will clump and start to gel immediately after being added to a liquid and it is hard to incorporate them evenly. 

2. Add the chopped strawberries to the sugar and chia seeds. Stir around and let sit for 10 minutes. The sugar will macerate the strawberries helping to release their juices making them break up easier.

 3. Turn on heat to medium and gently mash the berries until they break up a little and reach your desired texture. I like some chunks but mostly spreadable.

4. Bring to a boil and simmer for 15-20 minutes until berries are soft.

5. Take off heat and add lemon juice and whole chia seeds if using. Stir til incorporated evenly. 

6.     Pour into half-pint canning jars and refrigerate for 24 hours then move to freezer. Take one out and enjoy over toast, pancakes or yogurt. 

Cheers, 

PP

Easy Homemade Vanilla Extract

I love making thinkg from scratch. There is just something so satisfying to me about providing something to my family from start to finish. I love knowing that even if I buy the highest quality ingredients, I am still saving more money doing it myself rather than buying a premade lower quality item. That is definitely the case with making your own homemade vanilla extract.

"There's no such thing as too much vanilla." That is a saying my girls and I have whenever we need to measure out vanilla for a recipe and inevitably add more. We love to just open the bottle of vanilla extract and take a big whiff. It's amazing.

What isn't amazing is the price of vanilla extract lately. It has skyrocketed over the last couple of years. Last year, I went to Costco to buy my usual bottle of vanilla, only to discover that what used to cost me around $14 was $20. It's up to $25 now. That is a huge increase and unfortunately it's not going to change any time soon. I decided to do something about that and made my own vanilla extract and thought I'd share the recipe with you today.

Unlike most commodity crops, vanilla has no price regulations, which means that it is susceptible to dramatic price fluctuations due to supply and demand. For almost 10 years there was an abundance of vanilla on the market. That drove the prices down to the point where farmers couldn't make a living wage. So what did they do? They burned all their vanilla bean vines and decided to grow a different crop that would make them money.

Who can blame them?

But what that did is make an incredible shortage of vanilla beans for the next few years and prices skyrocketed. And this is where we find ourselves now.

Luckily, we don't have to be slaves to whatever price vanilla is currently selling at. We can make our own vanilla extract with just 2 ingredients. And what's best about it is that it will last forever.

INGREDIENTS   __________________________________________________________________ 
This is seriously the easiest 'recipe' in the world. All you need is Vodka and Vanilla Beans


Make sure to get grade B vanilla beans. Grade A are meant to be cooked with but grade B are meant for infusing and will give you a better flavor.  These look great or you can use Tahitian vanilla beans for a different flavor.  This is essentially a one time purchase. So while it might be a bit of money up front (about the same as buying a bottle of extract at Costco), you can continue to use these same vanilla beans indefinitely.

The good news is that even though the vanilla beans are pricey, you can buy the cheapest kind of vodka you can find. All you need is 80 proof, but the vodka itself doesn't matter. I like to buy vodka in a glass bottle so I can just use that for storing my vanilla extract too. If you buy vodka in plastic you should use a mason jar or other glass jar to store it in. Make sure it is tall enough to fit the beans standing up.

DIRECTIONS  ___________________________________________________________________
The usual recipe for vanilla extract that you would buy at the store is about 2-3 beans per cup of alcohol and is called single fold vanilla. The super fancy, extremely flavorful vanilla chefs use to create their dishes with a vanilla flavor that can't be matched by just doubling the amount of single fold vanilla is called double fold vanilla. Double fold vanilla calls for 5 vanilla beans per cup of alcohol.

Chose whichever you prefer. Just know that this vanilla extract can last forever. You can just top off the bottle with new vodka as you use it.


  • Drop the vanilla beans in the vodka whole. Don't slice them open. Some people like to slice the beans open so you can see the little seeds but it doesn't make the flavor any stronger to do it that way. If you leave your beans whole, you can pull them out one at a time for recipes that call for vanilla bean seeds. Just snip off the end and squeeze out the seeds to use in your recipe. Then just throw the shells back into the extract. It's like you are getting vanilla bean paste for free. 
  • Place your vodka in a cool, dark place and give it a shake every now and then. 
Your vanilla extract will be ready to use in 8 weeks, but will be best if you can wait at least 6 months. 

P.S. this makes a great, inexpensive gift to give to family and friends for Christmas. Just repackage it into smaller jars. These 4 oz ones are super cute and the perfect size. Make sure to get a funnel if you don't have one. You don't want to waste a drop of this delicious extract. 

Enjoy!

PP


Healthy Food on a Budget part 3


In an ideal world, all our food would be grown locally and organically. Instead, most of our conventionally grown food is drenched in toxic pesticides, fungicides and poisonous gases originally developed for chemical warfare and banned in most developed countries, including the European Union.

For example, lets take the worst offender: strawberries. The USDA is responsible for making sure our food is safe. It washes the produce like a normal consumer would and in some cases peels it, then tests it to see if there are any remaining substances. In 2014 and 2015, 99% of all strawberries had pesticide residues with almost a third having 10 or more pesticides per strawberry! The dirtiest had over 21. On. one. strawberry.

How can I as a mother feel good about feeding my little babies that? These hazardous chemicals are linked to cancer, developmental damage, reproductive disorders or sterility, hormone disruption and neurological problems.

I wish the United States had tougher regulations on what could be added to or used on our foods. Unfortunately it's not the case so we have to rely on optional labeling guidlines like Non-GMO project verified, USDA Organic and others to try to keep our families safe.

But, having those extra companies or programs checking and verifying our food adds to the cost and most of us can't afford to buy everything we eat grass-fed or pasture-raised, organic, local and humane certified.

So what can we do to keep the budget down but still afford healthy food? Here is the last list of ways I keep our food costs down while ensuring I am providing my family with healthy, safe food to eat. You can find part 1 and part 2 here and here.

BE FLEXIBLE  ___________________________________________________________________
If you can't afford buying everything organic then prioritize what would make the biggest impact on reducing your family's pesticide exposure. I love the Environmental Working Group. They do all the hard work for us. They analyze all the USDA testing results and rank our produce from those containing the highest pesticide residues to the lowest. If you can buy organic items of the top 12 foods with the most pesticide residues, you can reduce your family's pesticide exposure dramatically.
You can find the new 2018 Dirty Dozen list here. If you have a recipe that calls for an item that is really expensive to buy organic, substitute with a more budget friendly option.  Also, a great tip I have found it to buy from local farmers in my area. Many times they have great organic practices but they haven't gotten the 'organic' certification because it is so costly.
dirty dozen list, switch ingredients. local might actually be better but just not have the label.

MEAL PLAN  ____________________________________________________________________
 Do you know that the average family of 4 throws away almost $2,200 of food every year! That is a vacation somewhere every year you could be paying for instead. One way to avoid throwing so much money away is by meal planning. I am the worst at meal planning. I am used to just having a stocked fridge and pantry and 'shopping' from that when I want to make something. But I am trying to be better this year and plan out our meals. If every item you buy has a plan and a purpose, there will be very little waste left over.

BUY IN BULK   __________________________________________________________________ 
If you were to choose just one of my previous tips for saving money while still buying healthy, organic food; the one that would make the biggest impact is to cook all your food at home. It saves so much money. But, if you are cooking a lot, you will start going through ingredients a lot quicker so it's a great idea to buy food in bulk. Especially your cooking staples. Usually it seems you can save at least half by buying in bulk vs smaller packages. Costco is the best. Or Sprouts Farmers Market if you have one. That is my favorite store for getting great quality produce at a fraction of it's normal price. You can even buy their bulk bin items in bulk if you ask. I bought a 25kg  bag of quinoa for $1.99 a lb. If you wonder how to store all of your bulk item, stay tuned. I have a post about that coming up.

PLANT-BASED DIET  _____________________________________________________________
You probably knew this one was coming up but it really is such a money saver. We aren't vegans but I love to make a lot of vegan meals. 1- because they are super healthy and full of essential vitamins and minerals our Standard American Diet sorely lacks. 2- because they are so inexpensive. We love eating quinoa tacos, even my husband who is leery of my plant-based aspirations for our family. Just think about how much a pound of grass-fed ground beef costs ($6.99/lb). Now think about how much a pound of quinoa costs and how much more food that actually is volume-wise. Just in case you don't know off the top of your head. A pound of quinoa is about 2 cups dry. When it cooks, it turns to about 4 cups! So that is 8 cups of cooked quinoa per pound. Even if you are paying $3.99/lb for a tiny bag of organic quinoa you are still way ahead of the game over buying meat. When I make our quinoa tacos, the recipe calls for 2 cups cooked. So I could make the same meal 4 times for almost half what it would cost to make the grass-fed meat version once. If you are not sure how your family would view meatless meals, start slowly, maybe mixing half and half.

Last night I made grass-fed ground beef mixed with an even volume of cooked wheat berries. I just browned them up together so the wheat berries pick up the beef flavor and no one could tell the difference. This was for chili, but I made a similar thing a few days earlier and I just mixed it with taco seasoning and refried beans to help it all stick together in the taco. And they were delicious. Meatless meals really aren't as intimidating as they seem.

My oldest asked me the other day if she could have fruit if she were a vegetarian or just vegetables. I then told her of course she could have fruit and explained everything else she could have as a vegetarian then surprised her by saying, "everything you have eaten for the past 3 days has been vegetarian." She had no idea we eat vegetarian or vegan so often. I just don't make a big deal of it and avoid labels. I just talk about eating a rainbow of food because our body needs all the nutrients that come from all the different colors.

FREEZER SOUP  _________________________________________________________________
The last tip I have is related to not wasting any food. Many times I have little odds and ends of food that aren't enough for a meal. Extra noodles, beans, grains or meat and left-over veggies. The best thing to do with that is to throw it in the freezer bag and keep adding to it til you have enough to make a soup out of it. You could make an Italian soup with noodles, Mexican with beans, or countless ones depending on the meat you have let over. I love throwing extra gravy in with the broth to make it extra flavorful or mashed potatoes really help thicken a soup without needing cream. That is a trick I use often when making a chowder or other creamy soup.

I would love to know what tricks you like or use to help keep your family on budget while still being able to eat healthfully. Leave me a comment below.

PP

Guide to Maui, Hawaii

Hawaii- A place that captures our imagination with images of ultimate relaxation and breathtaking tropical beauty. It is really the ideal vacation in so many ways: no passports necessary but still feels like an entirely new cultural experience. No foreign language skills needed. I love trying to learn new languages, probably more than most, but sometimes its nice not worrying about being able to communicate. Gorgeous, other worldly scenery. Perfect weather and hardly any bugs. 
Now that we've established it's a must go, which Hawaiian island is best? For me, Maui takes the cake. It is the island that has it all.  I like to think of it as having two sides. There's adventure and exploration on the 'wild' side in rain forests and volcanic craters. On the 'developed' side, you will find ultimate convenience with entertainment, delicious food and 30 miles of beaches for snorkeling and sunbathing on the days you just want to veg out. 
      LAHAINA vs WAILEA
STAY    __________________________________________________________________________

Use either Lahaina or Wailea as your main hub. The best resorts (Four Seasons, Grand Wailea and Kea Lani ) are in quiet Wailea. Wailea also usually has better weather and the best swimming and snorkeling beaches. If you are looking for a busy night-life, art galleries, shopping and hustle and bustle, then Lahaina is the one for you.
Frugal Tip-You don't have to stay at one of the first class resorts to enjoy the incredible, less crowded beaches in Wailea. We stayed at the Hotel Wailea which is a lot less expensive but shares the same property as the Grand Wailea. Or look for a condo on VRBO.

ENTERTAINMENT _______________________________________________________________


Warren and Annabelle's-I don't think I have ever laughed as hard or for as long as the night we went to Warren and Annabelle's magic show. It is a mix of sleight-of hand magic and the funniest comedy you will ever hear. It is a little pricey, but worth the 4 hours of fun. First, you start out in a parlor enjoying appetizers, cocktails and dessert, then the party moves into the theater for the show. We volunteered for one of his tricks and were a constant fixture in that night's show with many good-hearted jokes at our expense. I love when comedians can be funny without resorting to shocking and off-color jokes.
KAPALUA
ADVENTURE  ____________________________________________________________________

Kapalua Golf Course- There aren't many golf courses played on the pro tour that normal people are able to get into and play. Kapalua is one of them and definitely worth taking advantage of the opportunity. Even for a non-golfer like myself, the course was amazing just to spend time at. The mix of....
Frugal Tip- afternoon tee times are discounted because the wind starts to kick up a little.

EAT ____________________________________________________________________________

Sansei Seafood Restaurant & Sushi Bar-a few minutes down the road, near the Ritz, is the most amazing sushi bar. Everything was incredible and so fresh! Try the Ahi Sashimi Roll, the mango sauce is to die for. Seriously the best sushi we have ever had.
Frugal Tip- get there early, any order placed before 6pm Tuesday-Saturday is 25% off. 
HANA TOWN
ADVENTURE ____________________________________________________________________


The Road to Hana- Even if you don't actually stay overnight in Hana, (you should), the Road to Hana is a must do. The famous Hāna Highway is a 68-mile long stretch of highway which connects Kahului with the town of Hāna in east Maui. Although Hāna is only about 52 miles from Kahului, it took us over 4 hours to drive as the highway is very winding and narrow and passes over 59 bridges, 46 of which are only one lane wide. It is virtually all through lush, tropical rain forest with stops all along the highway to see waterfalls or other points of interest. 
Tip- don't try to do every stop, choose a few highlights or you will get burned out halfway and miss a lot of the great stuff towards the end. Here is a great list of sights to choose from.

Seven Sacred Pools- a magical way to spend an afternoon. The Ohe'o Gulch or Seven Sacred Pools, are about 15 minutes past Hana town. There are actually dozens of pools and waterfalls which flow through the 'Ohe'o Gulch into the ocean nearby, but these ones are the biggest and most beautiful.

Pipiwai Trail and Waimoku Falls-This is supposed to be one of the best hikes on Maui and I would have to say it was otherworldly. Pipiwai is 4 miles round trip with a gain in elevation of 650 feet and several great waterfalls along the route. After hiking past several great waterfalls, the trail turns into this beautiful boardwalk through a 40 ft high bamboo forest. It was so amazing listening to the wind would blow through the bamboo making the bamboo stalks hit against each other. At the end of the hike you are rewarded with Waimoku Falls  flowing down a 400-foot sheer lava rock wall. It is absolutely incredible.
Read about about all our Hana adventures here.
HALEAKALA CRATER
ADVENTURE    ___________________________________________________________________
Haleakala- is a massive shield volcano that forms more than 75% of Maui. The other 25% to the west is formed by the West Maui Mountains. Inside the heart of Haleakala National Park is Pu'u 'Ula'ula (Red Hill). Here, on the tallest peak of Haleakala Crater, 10,023 feet above sea level you can have the most transformation experience watching the sun rise. As the sun begins to pierce through the fog and cracks in the crater a park ranger begins a quiet Hawaiian chant that gets louder and louder until it climaxes as the sun peaks over the mountain. There are no words to describe it but I thought it deserved its own blog post with more pictures which you can see here.
Tip-There is a really fun sunrise bike tour you can buy from several tour companies. They bus you to the top of the crater to watch the sunrise and bring up bikes that you can ride all the way down the mountain. P.S. It gets COLD on the top of a mountain covered in freezing cold mist. Pack accordingly.

Maui is one of those places where there is always more to discover. This is just the tip of the iceberg.

PP


Easy Windowsill Herb Garden


One of the little luxuries I love having in my kitchen is fresh herbs. It really make such a difference in giving your meals that little fragrant pop they need. But buying fresh herbs from the store is so expensive. And you only ever need a little bit for a recipe, so the rest just languish in the fridge until finally getting thrown away. Or is that just me? I hate wasting money on things like that.

Growing your own herbs is a no brainer that solves both these problems. Having inexpensive fresh herbs available and in only the amount you need.  I've been wanting a windowsill herb garden for awhile but hadn't gotten around to it. I saw these super cute herb planters at Crate & Barrel the other day and felt inspired. But not $30 inspired, no matter how cute it was.

The point to having fresh, organic herbs at my fingertips is to save money. So I searched around and found this one at Ikea for $9.99. I like it so much better. The added wooden base makes it more interesting. And, it was on sale! There is also a really similar one here if you don't have an Ikea near you.

If you've never grown plants before, don't be nervous. Herbs are the easiest thing ever. All you have to do is find a sunny windowsill. I give you a few more tips in helping keep them alive below.


But first, we need to assemble the garden. I don't sow my seeds directly in the planter. They need drainage. You can find these plastic seedling planters and saucers at any garden center or nursery for less than a dollar each. This was the smallest set I could find on Amazon (10). Maybe make a couple extra to give as Mother's Day presents!

They have drainage holes in the bottom and the saucer to catch anything that drips. And they are pretty nifty for letting you know how much water your plant needs. I just pour water til I see it start leaking into the saucer.

You can buy your herbs already started from a nursery but that will run you about $1.50-3.50 per herb depending on what size you get. A packet of seeds is about a dollar but you can usually find them Buy 1 Get 1 Free and grow them yourself. (Just stick the rest of the packet in the freezer until you need to grow some more.) You will definitely need patience but it is so fun to grow them all yourself.

I would pick 3 herbs that you use a lot and start there. Parsley, Basil, Cilantro, Chives, Mint, Dill, Thyme, Rosemary, Sage, there are so many options to choose from.

I chose Flat Leaf Parsley, Dill and Basil. Cilantro would have been on the list because I use it all the time, but I have a plant out in my garden that survived the winter that I can use. Yea! So when my dill gets too big, I will try to transplant it outside and trade it out for a pot of cilantro to last for next fall/winter.

If you are growing your herbs from seeds you will also need to buy a good organic potting mix. No use trying to grow organic herbs in Miraclegro. I really like this BlackGold brand and you can find it in most stores.


Follow the directions on your packet. You won't want more than 2-3 plants growing in your pot or they will get too crowded and not grow well. I would start with 5 seeds and then thin to the best 2 or 3 when the first true leaves appear by snipping the stem down to the soil.


If you bought your herbs from a nursery, just transfer them over and add more soil if needed. Place saucer underneath and give it a good drink til you can start to see water come out the drainage holes.


Place pots in the planter and put in a sunny window to enjoy! I love how it really brightens up my kitchen counter and instantly brings color to any dish. Just snip some off next time you need something and enjoy your super flavorful and hyper fresh herbs. We loved our parsley on Jambalaya Pasta last night.

Jambalaya Pasta
If you feel like you are not getting through your herbs fast enough before they need to be trimmed again then check out my post on preserving parsley here. I also love making pesto when I need to use up a bunch of basil. Stay tuned for the recipe.

Plant Care Tips-
Water- 2-3 times a week. I usually do Mondays and Thursdays. Stick your finger in the potting mix, if it is damp 2 inches down, it doesn't need any more water. If you accidentally pour too much water in, relax. The saucer will just keep the excess until the plant wants to suck it up. If you are growing from seeds, you will need to water every day until the shoot appears and the roots grow longer. Keep the soil moist.

Dirt- I know it might sound like a good idea to use dirt from your yard to fill the pots. It's free and easy but dirt is alive. There are many different ecosystems living in there. If you remove it from its natural environment you are also removing it from its natural predators and some bacteria or diseases could spread and get into your food or your house plants. A good, organic potting mix is worth the splurge.

Proper Pruning
It may seem counter intuitive, but pruning actually promotes growth.

Basil- After the seedlings have their first 6 true leaves, prune to above the second set. From then on, every time it has 6-8 leaves again, prune back to the 1st set of leaves. Pinch off any stems that look like it is going to flower. That will make your basil bitter if allowed to flower.

Chives-  To harvest, just cut straight across. Like you are cutting grass. They probably won't grow out of control like some herbs. Pairs so well with eggs, using in compound butter or tossing raw on soups salads or potatoes.

Cilantro/ Parsley- Once the plant is 6 inches high, begin pruning by trimming the outer leaves down to the bottom of the stem. Don't cut the inner leaves. These will continue growing and producing more stems. You can eat the stems. They carry so much flavor, making them perfect for flavoring soups/ broths or sauces you will blend. I use mine all the time in guacamole and eggs, I just mince very small.

Dill- I love dill. My favorite is to use it to garnish Borscht. It tastes so good with beets, fish (especially salmon), yogurt sauces and of course pickles. I've got a killer pickle recipe I will be posting this summer so stay tuned!

Mint- Young leaves have more flavor so the key to keeping mint at its best is frequent harvesting. I love to use mint leaves in my ice water. It is so refreshing. Just make sure when you trim to make sure there is still at least 1 set of leaves on the stem.

Oregano- This herb does better outside because it likes to sprawl. If you are dead set on it, just make sure you trim it back often so it doesn't have a chance to get woody.

Rosemary- Rosemary is a beautiful plant and grows straight up so it's perfect for an indoor garden. Just cut a couple inches off from the top leaving leaves below to keep growing.

Thyme- Thyme is such a hardy plant. Both for cooking in high heat and for staying alive. Basically make sure you never cut below the first leaves and you'll be fine.

Last but not least. Never trim more than 1/3 of a plant at any given time or it will go into shock and may not recover.

I hope you feel inspired to make yourself an herb garden to enjoy fresh herbs at your fingertips any time you need. Leave a comment below and let me know which herb you find yourself using the most.


PP

Naturally Dyed Easter Eggs


Those of you who have been following me for a while know that I am not a fan of all the dyes, fillers and engineered ingredients that are allowed in our food these days. For that reason, I am so excited to share with you a few ways you can dye food cheaply and naturally.

There are a lot of recipes of different ways to naturally dye eggs but some of them are ridiculously expensive. One recipe calls for 3 cups of blueberries! Even if I got the blueberries on sale for $1.50 for 6 oz, there is no way I am going to spend $4.50 to for just one color of dye. Or using half a cabbage. I don't like wasting things either. Although that does make an amazing deep blue color...

So I rummaged around in my cupboards and found a few things that are inexpensive and all natural.


Obviously you want to start with boiled, then cooled eggs. My mom swears that her 5-5-5 recipe results in perfect eggs every time. Place eggs in pot and cover with cold water. Bring to a low boil and boil for 5 minutes. Take off heat and let sit in hot water for 5 minutes. Dump out hot water and fill pan with ice/ very cold water for 5 minutes. Perfect color of yellow with no gray line. And easy to remove shells. You're welcome.

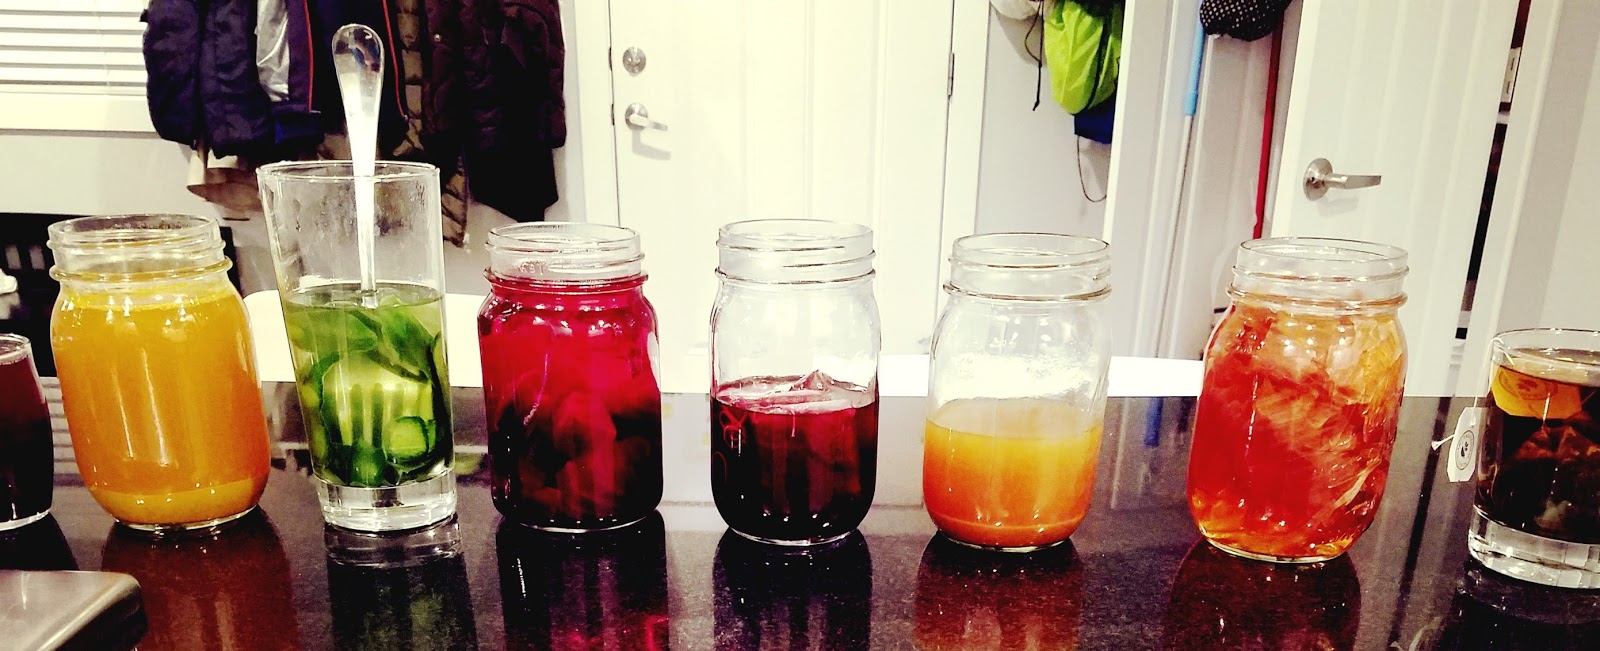
I wanted to try all kinds of colors. There were some I knew would work, but others were experiments. Green is a hard color. You can make green using spinach but I didn't want to use 2 cups of chopped spinach or boil it for 20 minutes. So I thought maybe I would try cucumber peel. It didn't work. My recipes are the easiest and fastest. I just put all my ingredients in canning jars and pour boiling water on top and let them steep until they cool (30-40 minutes). I strain them, add 1 Tbls of white vinegar and plop in a hard-boiled egg.

Blueberries, Tumeric, Cucumber Skins, Beets, Hibiscus Tea, Paprika, Onion Skins and Nettle Leaf Tea
Colors
Pink- Luckily, I had some roasted beets in the fridge to make Borscht with. So I used one of those. After it had colored the water and strained it, I stuck the chopped pieces back in the fridge for my Borscht. They were still tasty and had plenty of flavor. That's also why I wait to put the vinegar in until after it is strained.
Yellow- 1 Tbsp Turmeric
Green- I used a yellow turmeric egg then put in the blueberry mixture for 1 hour. It might not look green when you pull it out but wait for it to dry. It's a pretty sea foam green color. Or for a bright green, steep 2 cups chopped spinach in boiling water.
Blue- So I had smaller glass cups and thought it would be fun to try the blueberries. I just grabbed 1/4 c frozen blue and blackberries from a Costco fruit medley bag so it turned out to be pretty inexpensive.
Black- 3 bags of Hibiscus Tea. This one was surprising, I was thinking it would turn red like the tea but the eggs actually turned black.
Tan- 1 Tbsp Smoked Paprika. This one was fainter than I hoped. But it still worked ok.
Orange- Onion skins from 3 onions. Just crunch them up and put in the canning jar with boiled water
Brown- 3 bags of Nettle Leaf Tea. I was hoping this might turn green too but it turned more brown.
Purple- Dye one egg in the beets first, then switch to blueberry color for 30 minutes.


Designs-  House plants are perfect for using for making designes. I just used leaves from Piece Ivy, some blades of my Cordyline Indivisa, rubber bands, and the top of a strawberry. You can also use a white crayon to draw patterns with as well. I used some scrap pieces of cheesecloth to hold the leaves tight against the eggs and secured with twist ties.


I did these late at night. I tried 1 egg in the beets and 1 in the turmeric for about 30 minutes. They are the 2 on the bottom left. You can see the turmeric worked really well in that length of time and the beets turned it a light pink. I was tired so I filled the rest of my jars with eggs and stuck them outside. You can stick them in the fridge overnight but mine was full and luckily temps were like 36F. I like to use the egg carton to rest the drying eggs on.

L to R- Paprika, Beet (30min), Turmeric (30min), Turmeric (all night), Blueberry, Beets (all night), Beet and Blueberry mix, Hibiscus Tea, Nettle Leaf Tea, Onion Skins.

It's so fun to see how they all turned out. Didn't those designs turn out so fun? I love the strawberry top. The kids loved waking up and pulling the eggs out of the solutions to see how they changed. I love that this is a fun, inexpensive and all natural way to dye eggs. Let me know in the comments which ones are your favorites and if you plan to naturally dye your Easter Eggs too.

PP

How to Make Beef Bone Broth

So we all know by now how nutritious and good for us bone broth is. Even the major food brands all have their own cartons of bone broth on the shelves. I'm glad that more healthful options are being offered these days and buy a few cartons here and there for convenience. But, when I have the option, I love to make my easy homemade bone broth in a crock-pot.

Grocery store bone broth can't hold a candle to it in the health department. Do you know how I know? A good bone broth will turn into almost a jelly when it cools. That's how you know it is full of collagen. Collagen is a power house in the health department. It helps reduce joint pain and strengthen bones, improves and strengthens hair and nails, helps improve liver and gut health including detoxification among so many other things.

My sister-in-law and I went in on part of a grass-fed cow together from a local farmer here in Utah. Best way to save on grass-fed/pasture-raised meat by the way. I've been loving all the different cuts of meat that I don't usually buy from the store since they are usually way more expensive than just grass-fed ground beef. But one of the things I was most excited about was having a bunch of soup bones to make bone broth with. When you buy a cow, they ask if you want the bones. Say "YES!" The broth you get from bones is rich, velvety and chock full of the most essential vitamins and minerals that are so lacking in our diets. I just throw my soup bones in my deep freeze and take out a package or two at a time when I want to make some broth.

And making homemade bone broth couldn't be easier. You can obviously use a stock pot on the stove with this recipe too. I just love the easiness and worry free setting and leaving of crock-pots.


Start with about 2 pounds of soup bones. Ideally, half should be joint bones because they will contribute the most collagen to your broth.  Lay them out on a sheet pan covered with parchment paper. Anything to make clean up shorter, right? Now salt and pepper them really well. I like to use my kosher salt for things like this.


Next, you'll want to brown the bones in a pre-heated 350 degree oven for about 30 minutes, turning at the half way mark. This really helps develop the flavor of the broth so much.


While your bones are browning, it's time to assemble the rest of the ingredients. I love using the inside stalks of my celery for stock. The leaves actually have so much flavor and they are a part of the plant that we don't usually eat, so I love to make sure I use them all up. When I am buying organic produce, I like to make sure I use the whole plant. You can read more about how I save money on our organic and grass-fed foods here and here.  Another thing I like about making stock is that you it helps to clean out the fridge and use up anything that is getting a little old and maybe isn't in its prime texture wise. You can see my carrots are on their last leg too. They were still perfectly crunchy but starting to sprout. Just wash your veggies, you don't need to work about peeling or chopping.

Dehydrated Onions
Start to put your veggies in the crock-pot. You make have to break your carrots in half to get them to fit. Now I'm going to share one of my favorite things to use in my broths. Dehydrated onions. If you don't have any then by all means just halve an onion and throw that in. But, once a year I get a 25 pound bag of onions for about 3 dollars! Obviously we can't get through that many onions before they would go bad so I dehydrate them.


I love them! Once, I also saw organic celery for .50 a bunch so I bought a ton of them and dehydrated them too. I love to throw them in my soups, chilis and bone broths.

Ok, so back to the broth.


Add a bay leaf or two. You can also put in a few black peppercorns. No more than 5.


Once your bones are browned, take them out of the oven and nestle into your veggies and cover with water. You want your bones covered at all time. Pour in 2 Tablespoons of Apple Cider Vinegar and turn on the crock-pot for at least 8 hours but preferably 24. It takes a while to get all the goodness out of the bones. You can leave it to simmer for up to 72 hours but I find 24 is just fine. That way I can start it in the morning and by the next morning it is ready to use to make something for dinner that day. You'll want to cook it on high until it starts to simmer then turn it to low for the rest of the time. You don't want it boiling. It will destroy the collagen if it is cooked too high. A nice simmer is just right.


When it's done, strain it over a bowl so you can catch every. last. drop. I like to keep mine in mason jars. See that white layer on top? That is called tallow. You can cook with it, especially if you want a healthy, pasture-raised fat. Or in the olden days, because the fat was so hard, it takes a long time to melt, making it ideal for candle making.


If your broth looks like this when it is cooled, you did it just right. Look how jiggly it is. Perfect. Don't worry, it will liquefy when you warm it up again.

Now it's time to enjoy in all your favorite recipes. Stay tuned for my French Onion Soup recipe. And if you would like to learn how to make Turkey Bone Broth you can find the recipe here.