If you have saved $1000 in an emergency fund and paid off all your debt except for your house using the debt snowball, then you are ready to move onto Dave Ramsey's Baby Step 3.
This babystep is fairly straight forward. You want to pile up cash for 3-6 months worth of expenses. Remember, this is an emergency fund so you only need to count your necessary expenses. Utilities, Food, Mortgage etc. You probably wouldn't be worried about paying for cable if you were in a tight enough situation that you were using this fund.
Keep this money were it is liquid or very accessible. That means a money market or bank accounts. Do not use this money for investing. This money needs to be there when you need it.
There are a few factors to consider when deciding whether to do save 6 months of expenses instead of 3.
- Are you self-employed? (lean towards 6 months)
- Is your income irregular? (lean towards 6 months)
- How is the current job market? Right now with unemployment so high I would rather 6 months of expenses covered in case of job loss.
- How is the economy in general? Does it seem stable? ie inflation vs. deflation, short food supply
- What are some of the political plans being talked about? ie raising taxes, stimulus plans
For me, I'm more comfortable having cash for 6 months of expenses saved up, but anything is better than nothing.
How are you feeling about the outlook of the economy right now? How many months are you going to aim for?
I know you probably saw the title of the post and thought; Really? How hard is it to open a 5 gallon bucket? But until you have ever tried for 45 minutes to pry the lid off of one of these suckers you won't appreciate the tips I'm about to share.
Bulk grains usually come in 5 gallon buckets when you buy it for food storage. Food-grade 5 gallon buckets are great. They have an airtight seal and are hard and thick enough that rodents can't gnaw their way through.
That is great for long-term storage but makes it a pain for short-term storage.
I keep my flour in a 5 gallon bucket and use it to replenish my pantry container when it gets low. The only problem is that if it is the middle of the day and I run out of flour, I have to wait for my husband to get home from work to get it for me.
Now I will admit that I have never had very strong arm muscles. My arms fall asleep if I put my hand in a fist. So I'm sure there are a lot of people a lot stronger than I am but I literally cannot open a 5 gallon bucket by myself. If by some miracle I get the lid off, I haven't ever been able to get it back on. I'll stand/jump on the lid and think of anything I can to get it back on but it's impossible for me.
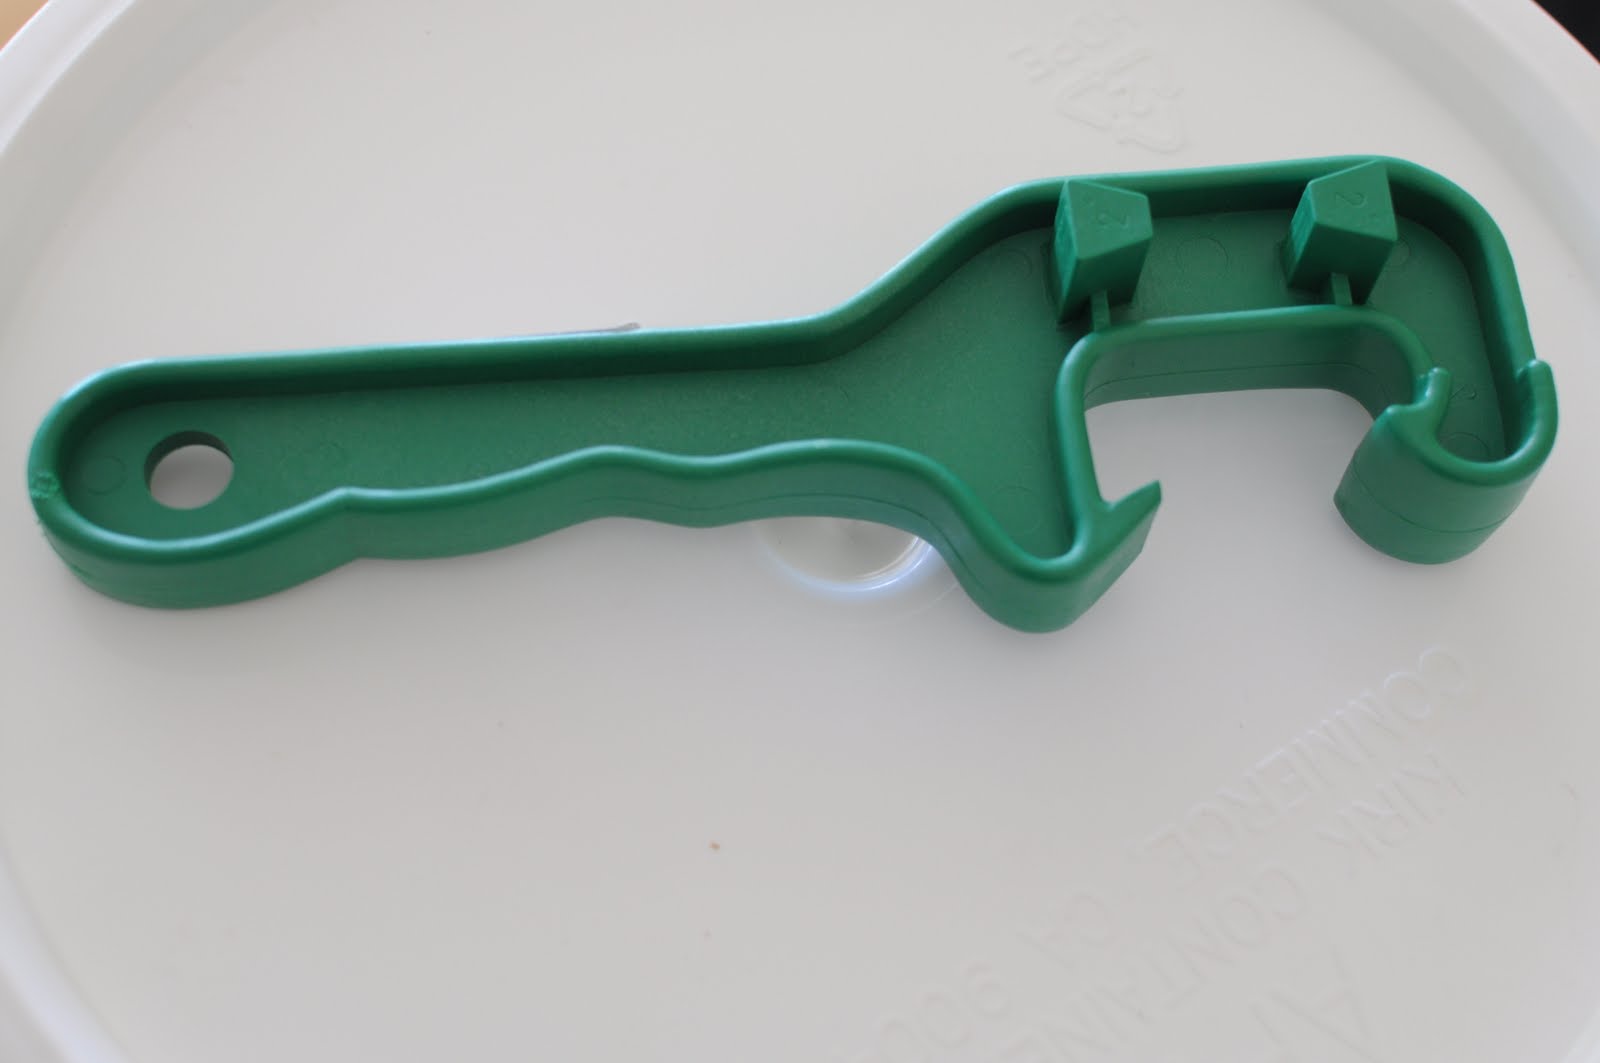
I was getting so frustrated with not being able to get my flour when I wanted it. Luckily, my church announced a group deal they were arranging where you could buy a bucket wrench/ lid opener. I'd never heard of it before but was sure glad to get one. I have since found them at Walmart for about $4 or you can get one online
here.
It is pretty handy. My husband used a flat-head screwdriver to help get off the lid before we got this. I definitely think this is great to have if you have long-term food in 5 gallon buckets but it doesn't solve my problem with getting the lid back on.
GAMMA SEAL LID ____________________________________________________________
This is the coolest thing ever! It still maintains the airtight seal with the rubber gasket around the ring. But the center of the lid twists off easily, let me repeat, easily to access the food inside and twists right back on to close.
Now these are obviously more expensive than regular lids but have made my life so much easier. I got mine for $7. My grocery stores carry them when they hold their case lot sales. You can also get them online here or a 6 pack of different colors here.
They also come in an assortment of colors so you can color code your food if you want. I decided to just get a few. I don't need them on every bucket. When I need to open a new bucket, I will take off the old lid and replace it with the gamma seal lid from my last empty bucket. That way I'm reusing the gamma seal lid over and over instead of being left with extras once my 5 gallon bucket is empty like I would if I got them for all of my buckets.
I love things like this and hope it helps you too.
Raised Garden Boxes
I know I've been MIA lately. Having a new house and new baby leave me with surprisingly less time than I expected. I have a bunch of half finished posts saved but by the time I get on the computer to finish one another idea pops into my head and I work on that 'til my baby wakes up and I have to save it half finished 'til the next time...It's a vicious cycle.
This is a quick one though.
I just had to show you all what my amazing husband made me over Mother's Day weekend.
I love watching my hubby while he's working with power tools, it's so manly!
He researched all about raised garden boxes and found out that you are supposed to use either redwood or cedar because they stand up better to the outdoor elements and will last a lot longer than other woods.
The second step to planning a garden is deciding where you are going to have it and how much place you need to grow what you want.
My husband and I chose a place with really good sunlight and decided how much space we needed. We figured 2 4x8' boxes would be enough.
I really wanted to have a raised garden.
Having a raised garden is great. If you are like me and have horrible soil in your backyard you probably don't want to try amending all the dirt in your yard to be garden friendly. It would be a pain and way too expensive.
With a raised garden boxes you can choose a specific amount of space that you need and just amend that soil. We are buying a 50/50 top soil/ compost mix and having it delivered. This way I won't have to pull my hair out just trying to get my dirt ready for planting and can focus my limited time into maintaining an already fertile garden.
Here are some other pros to having a raised garden:
They also allow your soil to stay more aerated which allows your plant roots to grow easier since the dirt isn't being compacted by you walking across the ground.
Water can drain easier.
Your plants can be spaced closer together since you don't have to worry about walking space.
It is easier on your back. This is a huge bonus for me because I have a bad back. With the dirt we are bringing in my garden will practically be weed-free so I won't have to spend a lot of time bent over weeding and when I do need to lean over it isn't as far as the ground is.
And the best part is that you can produce up to 2 times as many crops in the same space as an ordinary garden would be able to.
Don't they look great? Now all they need is some dirt and I can get planting!
I saw an interesting article on Yahoo! the other day and learned some new things. The author listed 9 cooking staples that can last forever (usually if they are stored in an airtight, cool, dark place which is the recommendation for most food storage...)
Most of them I knew. Sugar, salt, rice, white distilled vinegar, and honey.
But these are the ones I didn't know.
Pure vanilla extract
If you have pure vanilla extract in the back of the cupboard, there's no need to throw it out because it lasts forever. It may be more expensive than its imitation counterpart, but its shelf life certainly outweighs the extra cost.
Keep that vanilla flavor at its best by sealing the botttle after each use and storing it in a cool, dark place.
(I was most excited about this one. There aren't a lot of spices and seasonings that you can store forever. I think most people think of food storage as bland so imagine how nice it would be to be able to flavor your food with some vanilla.)
Corn starch
You can thicken gravies and sauces for years with just one box of corn starch because it keeps indefinitely. Store this kitchen staple in a cool, dry area and be sure to reseal it tightly after each use.
Corn syrup
If you come across a years-old bottle of corn syrup in your pantry, don't throw it out. This sweetener keeps indefinitely as long as you keep it sealed and store it in a cool, dry area.
Maple syrup
What good are pancakes or waffles without maple syrup? Luckily, this flavorful syrup will never spoil if you refrigerate it or freeze it. For long-term storage, seal it in an airtight plastic container and freeze it.
(This is my opinion, but I don't want to take up space in my freezer for maple syrup. I will just store maple extract and I'll be able to make 50 servings or more with just one bottle. As long as I store enough sugar to go with it that is.)
To check out the full article click this link
http://shine.yahoo.com/event/green/forever-foods-9-cooking-staples-that-can-outlast-you-2456896/;_ylt=AvvDaGEMbFVuESH6VZ_oI4n7hKU5?pg=2#comments
Hope all of you are getting your gardens in the ground and well on their way. I've been a little bit of a slacker but luckily the weather has been cooperating and has been colder than usual so I'm not behind yet on what I'm wanting to plant.
I went to an Emergency Preparedness Fair over the weekend. It has really had me thinking about what I need to do to get my family more prepared. Disasters can happen anytime. Just look at Japan and the crisis the people are in because of the earthquake and tsunami and now the nuclear disaster threat that is keeping people shut in their homes(sheltering in place) until the radiation scare is gone.
I'm really excited to share the things I learned with you all over the next few weeks, especially ideas for alternate cooking methods. But first things first. If a disaster happens, you need a disaster supplies kit.
For years we've been told to have a 72 hr kit but after Hurricane Katrina happened, some people didn't see relief in over a week. So now FEMA recommends having a disaster supply kit that can provide for your family's needs and not really get hung up on just the 3 days part. They say it would be wise to plan for at least 3 days but more likely 5-7 days.
I think the best idea would be to make 2 types of kits. 1)Disaster Supplies Kit- that has everything you need if you can stay in your home with your family after a disaster and 2)a Grab Bag- a smaller, lightweight version for each family member that they can grab quickly if you are required to evacuate.
Here is a list of some things that would be good to include in your Disaster Supplies Kit. I will cover the grab bag in a later post.
Water-
Store one gallon of water per person, per day. 2 qts for drinking and 2 qts for food preparation and sanitation.
Food-
Non-perishable food that requires no refrigeration, preparation or cooking and little to no water since you may be without utilities.
Some ideas include- ready to eat canned meats, fruits and vegetables, canned juices, milk, soup.
High energy foods- peanut butter, jelly crackers, granola bars, trail mix
Vitamins
Food for infants/ elderly persons or those with special diets
Comfort/stress foods (especially good for kids)- cookies, sweetened cereals
Disposable utensils and plates and a hand can opener.
Note-If we are staying at home, I plan on being able to tap into our 3 month supply of food but a lot of that still needs to be cooked so it is still wise to have ready to eat food available too.
Tools and Supplies
Emergency Preparedness manual- like a boy scout manual
Battery-operated radio and extra batteries (or solar powered/hand crank radio)
Flashlight and extra batteries
Cash- in small denominations
Fire Extinguisher
Tent
Pliers
Tape/Duct Tape
Matches in a waterproof container
Paper, pencil
Needles, thread
Shut-off wrench (to turn off household water and gas-only if you can smell or hear a leak or see a broken pipe)
Whistle
Plastic Sheeting
Extra set of car and house keys
Alternative cooking methods and fuel
Sanitation
Toilet paper
Soap, liguid detergent
Feminine supplies
Personal hygiene items
Plastic garbage bags and ties (for personal sanitation uses)
Plastic bucket with tight lid (make-shift port-a-potty)
Disinfectant and household chlorine bleach
Clothing and Bedding
Sturdy shoes or work boots
Blankets or sleeping bags
Hat, gloves and thermal underwear
Special Items
Remember family members with special requirements:
- Baby- Formula (even if you breastfeed, what if you were separated or something happened to you? I just keep the free samples the formula companies send in the mail in our disaster supplies kit). Diapers and wipes, bottles, powdered milk, medications
- Adults-Heart and high blood pressure medication, insulin, prescription drugs, denture need, contacts and supplies, extra eye glasses, batteries for hearing aids
- Pets-Medications, letter and littler pan, food and drinkable water for 3+ days,
Entertainment-
Chances are good that you and especially your children will have a lot of down time if you are staying at home after/during a disaster. Games and books along with other toys will really help to pass the time and ease tension.
Important Family Documents
Keep these records in a waterproof, portable container just in case you need to take them with you if you evacuate
Will, insurance policies, contracts deeds, stocks and bonds, passports, social security cards, immunization records, bank account information, credit card account numbers, companies and phone numbers. Inventory of valuable household goods, important telephone numbers, family records(birth, marriage, death certificates), recent family photos for identification.
First Aid Kit- One for your home and a smaller one in each car. I will cover those in more depth in a later post as well.
Remember to change your stored water at least every year and replace your stored food every six months. I do mine in April and October. That seems to be a good time to change out seasonal clothing. Make sure to test/ replace your batteries too.
If there are any other things you have included in your Disaster Supplies Kit I would love to hear it.
The best way to start on your disaster preparedness plan is to identify the disasters that are most likely to happen in your area.
It would do me absolutely no good to prepare for a hurricane when I am landlocked in the middle of the Rocky Mountains. The disasters that are predicted to happen in my area are severe winter storms and earthquakes.
I've heard my whole life that we're due for a massive earthquake but it just never really seemed realistic. We've never had a big earthquake here. It's not like California where earthquakes are a common occurrence and the distruction earthquakes cause is a visible reminder to the public to get ready for the next one.
Imagine my surprise when the week we moved into our new house we also experienced 3 earthquakes in 3 days!
Luckily, they were just small and no one reported any damage. It got me thinking though. "What can I do to protect my family and house from a bigger earthquake?"
Before an Earthquake
Prepare Your Home-
- Repair defective electrical wiring, leaky gas lines, and inflexible utility connections. Get appropriate professional help. Do not work with gas or electrical lines yourself.
- Bolt down and secure to the wall studs your water heater, refrigerator, furnace, and gas appliances. (most new houses in my area come with the water heater already secured. Your water heater can be a part of your emergency water supply if you find yourself without any during a disaster.)
- Place large or heavy objects on lower shelves. Anchor bookcases, shelves, mirrors, and large picture frames to walls. Brace high and top-heavy objects. Just like baby-proofing!
- Store bottled foods, glass, china, and other breakables on low shelves or in cabinets that fasten shut.
- Anchor overhead lighting fixtures.
Prepare Your Family-
- Hold earthquake drills with your family members. Teach your children that just like Stop, Drop and Roll for a fire, you should Duck, Cover and Hold On during an earthquake.
- Locate safe spots in each room under a sturdy table or against an inside wall. Reinforce this information by moving to these places during each drill.
- Teach all adults and teenagers where the gas, electric and water main shutoff controls are and how to turn them off. Make sure you only shut them off if you are sure there is a leak. Otherwise you will be without those utilities until the power and water companies can come turn them back on. This sometimes can take 2 weeks or more.
- Identify escape routes from your home and neighborhood. Most likely not everyone is going to be at home when a disaster strikes so you need to have a preplanned meeting place for everyone to reunite. We decided to have one right outside our house and also outside our neighborhood in case we aren't allowed to go back in. (These can be the same ones used for your fire drills too.)
- Have an evacuation kit for each member of the family that is easily transportable by that member.
- Designate an out of state contact. Something interesting I have learned is that during an emergency it is easier to make long-distance phone calls than local ones because the local lines are all jammed with everyone around trying to call everyone they know. You should set up one out-of-state contact that everyone in your immediate and extended family knows about because that way everyone can just check in with one person who can then relay any information needed and concerned relatives from other places can get updates without stressing out the people who are actually in the disaster.
During an Earthquake
If you are indoors-
- Take cover under a sturdy desk, table, or bench or against an inside wall, and hold on. If there isn’t a table or desk near you, cover your face and head with your arms and crouch in an inside corner of the building.
- Stay away from glass, windows, outside doors and walls, and anything that could fall, such as lighting fixtures or furniture.
- Stay in bed - if you are there when the earthquake strikes - hold on and protect your head with a pillow, unless you are under a heavy light fixture that could fall. In that case, move to the nearest safe place.
- Use a doorway for shelter only if it is in close proximity to you and if you know it is a strongly supported, loadbearing doorway.
- Stay inside until shaking stops and it is safe to go outside. Most injuries during earthquakes occur when people are hit by falling objects when entering into or exiting from buildings.
- Do NOT use the elevators.
If you are Outdoors
- Move into the open, away from electrical lines, trees and buildings. Drop to the ground and wait for the shaking to stop.
If you are in a Moving Vehicle
- Pull over slowly and away from traffic but as quickly as safety permits and stay in the vehicle. Avoid stopping near or under buildings, trees, overpasses, utility wires and near roadway signs that might fall.
- Proceed cautiously once the earthquake has stopped, watching for road and bridge damage.
If you are Trapped Under Debris
- Do not light a match.· Do not move about or kick up dust.
- Cover your mouth with a handkerchief or clothing.
- Tap on a pipe or wall so rescuers can locate you. Use a whistle if one is available. Shout only as a last resort - shouting can cause you to inhale dangerous amounts of dust.
After an Earthquake
- Check for gas or water leaks and electrical shorts and turn off damaged utilities. If they do need to be turned off don't try to turn them back on yourself. Have the fire department or gas and electric companies turn them back on when it is safe.
- Be prepared for aftershocks. These secondary shockwaves are usually less violent than the main quake but can be strong enough to do additional damage to weakened structures.
- Open cabinets cautiously. Beware of objects that can fall off shelves.
- Stay away from damaged areas unless your assistance has been specifically requested by police, fire, or relief organizations.
- Obey evacuation orders- I get so sick of hearing about people who refuse to evacuate and thereby place themselves and others in danger needlessly. Do what you are told. It is for your own safety.
Resources
http://www.fema.gov/hazard/earthquake/- you can find your earthquake risk, ideas and support for preparing for earthquakes and additional information to print off and share with your friends and family.
My favorite food in the world is breakfast food. I would choose a good plate of hash browns and french toast over a rib-eye steak and mashed potatoes any day.
The thing that makes good breakfast food great is all in the syrup.
I know it's weird but I hate store bought syrup. I don't know what it is about it but it just doesn't taste good to me. Luckily, when I was a kid my dad always made homemade maple syrup to go with his homemade waffles so I didn't have to worry about it.
So for me, I always make homemade maple syrup because I like it better. But you may decide to make it because it costs about 1/3 the price of store bought syrup and it is super easy to make. And, not that sugary syrup is good for you, but you might be comforted to know that the main ingredient isn't high fructose corn syrup like store bought syrup is..
Homemade maple syrup only has 3 ingredients.
2 cups sugar (yes, I know this is a lot but what do you think syrup is made out of?)
1 cup boiling water
1/2 tsp maple extract or mapleine (I use closer to 1 tsp)
Directions
Heat water in a saucepan to a boil. Stir/whisk in sugar until it dissolves. Remove from heat and stir in maple extract. Done!
Didn't I tell you it was easy? I can whip up a batch of this while my french toast is cooking and everything is done at the same time.
My favorite way to eat it is over homemade wheat waffles covered in peanut butter. The heat from the syrup melts the peanut butter and makes it perfectly creamy. Sometimes I like to put banana slices on there too.
Mmm... I know what I'm making tomorrow for breakfast.
Just store the leftovers in a mason jar in the fridge and reheat in microwave or stove when needed. Syrup lasts forever. The great thing about this syrup is that you can use it as a base for other flavors too. Sometimes I'll throw some blackberries or raspberries in for a different flavor and it always turns out delicious.
Homemade syrup is runnier than store bought. It doesn't bug me since I'm used to it. If you want to make it thicker, just substitute 1 cup of the sugar for brown sugar or karo syrup. The brown sugar will even give it a richer flavor.
You can plant anything in your garden, but it doesn't mean just anything will grow there.
So before you start running away with ideas of what kind of vegetables and fruits you would like in your garden, you need to find out which plant hardiness zone you live in. The USDA divided North America into 11 hardiness zones.
These zones provide a guide in figuring out which plants will grow and survive in your location and minimum annual temperatures. The National Gardening Association has a great zone finder tool. Just type in your zipcode and it will tell you what zone you live in and also gives you a lot of helpful resources like a regional report with helpful hints suited to your area and a tool to help you find plants that grow in your zone.
Tips:
- Just because the map says you live in one zone doesn't necessarily mean that you only can have plants rated in that zone. If you have a lot of snow cover in the winter the ground stays warmer so you can probably grow plants that are rated for a high zone since their roots will be well insulated. Also keep in mind your summer temperatures, length of days, soil moisture and drainage and elevation as these can affect plant choices too.
- Your hardiness zone number does not tell you when you can plant your garden. You need to go by your first and last freeze/frost dates. This gardening website has a really user friendly frost date finder tool with more in-depth information.
Based on these tools I found out that
- I live in hardiness zone 6B and that each winter, on average, my risk of frost is from October 26 through April 22. Almost certainly, however, I will receive frost from November 14 through March 25. I am almost guaranteed that I will not get frost from May 20 through October 7. My frost-free growing season is around 187 days.
This information is going to be what I use to plan my garden. More on that next week. Until then, check through some lists of which plants will grow in your area.




 that most people are accustomed to and the least expensive. Most table salt in the industrialized world has had iodine added to it. Iodine is an essential trace mineral our bodies need. Iodized salt can prevent goiter (swollen thyroid) which usually occurs when someone has a iodine deficiency. Most table salt has also had an anti-caking agent added to it to keep it free flowing even when it is humid. In fact, the slogan used by Morton's Salt is "when it rains, it pours" and shows a picture of a little girl out in the rain but her salt shaker still works. One thing about iodized salt is that it may yellow over time. It's just the iodine, it doesn't effect the flavor and is still completely safe to eat.
 Pickling/Canning Salt- This
  is pure, which means that there is no iodine in it nor is the anti-caking agent present. The reason pickling salt is used is because the iodine in table salt can cause your canning jars to turn cloudy and can discolor your food. Make sure you factor the amount of salt needed if you plan to be able to can and preserve your harvest to supplement your 1 year supply of food storage.


 Posts
Posts

