Using Your Food Storage- Split Pea Soup

December 30, 2010 The Provident Princess 0 Comments

Winter is a great time of year to use some of the grains and legumes you have in your food storage.One of the things I love most about the cold months of winter is looking out of my window at all the snow while eating a nice, hearty soup. My favorite is Split Pea Soup.

My family always has ham for our Christmas Eve dinner and my mom gives me the ham bone and some of the extra meat if I promise to make my Split Pea Soup to share with her.

Like any good soup recipe, it is easy to make but I wouldn't recommend trying to make this soup unless you were going to be home all morning.

Ingredients
2 C. dried split peas
2 quarts cold water
1 ham bone
1 onion, quartered
1 teaspoon salt
1/2 teaspoon ground black pepper
1/4 tsp dried marjoram and/or thyme
1 bay leaf
1 big clove garlic
3 stalks celery with leaves, halved
2 carrots halved
1 1/2- 2 C. left-over ham, cubed
2 C. celery, chopped (optional)
2 C. carrots, chopped (optional)

Directions
1.

In a large stock pot, combine ham bone with garlic, onion quarters, celery and carrot halves, marjoram, bay leaf, salt and pepper. Cover with water (about 2 quarts) and simmer for 1 hour.

Meanwhile...


Rinse and sort split peas. It is fine if you have some that are yellow. That is natural. You want to look for any shriveled up ones or things that just don't look like they belong. I've found things that look like little pieces of grass or hay before.

Set Aside. (Most split peas don't need to be presoaked but check your package. If they do, stick them in a stock pot, bring to a boil for 2 minutes then remove from heat to soak for an hour while your ham bone simmers.)

A word about organic.
I'm not a huge proponent of organic food. I used to be really anti, thinking it was just a trend people were going through. Call me stubborn but I hate fads. To the point where I do the opposite just to prove a point. But, as I've become a mother and have made all of my daughter's baby food, I have become more concerned with what is in the food I am feeding her. 

There are somethings that I think are worthwhile to get organic versions of. Besides organic bananas, which I just think taste better and don't leave a film in your mouth, these peas were my very first organic product I ever bought. 

I was in the store wanting to stock up on some split peas and I noticed that the organic version was on sale for about the same price as the regular split peas. I decided to check the nutrition information on the back of the bags and was very surprised when for the same serving size and carbohydrate amount, the organic version delivered almost twice the protein and fiber. 

I know it isn't supposed to make a difference nutritionally whether you eat conventional or organic foods. People are more concerned with their carbon footprint and their foods being genetically modified or having residues of pesticides and fertilizers on them. With split peas though, I could see the nutritional difference was clear. So I bought the organic version.

Sorry, back to the recipe.

2.
After 1 hour of simmering, add sorted peas. You may need to add more water to keep everything covered. Simmer for 45 minutes- 1 hour.

3.
Check to see if your peas are cooked and soft. If so, remove ham bone and bay leaf. Working in batches, blend your soup til it is velvety smooth (or use an immersion blender). I even blend up the celery, carrots and onions to give the soup a richer flavor and I figure it doesn't hurt to keep all the nutrients in there.

4.


Return everything to the stock pot and add the chopped carrots and celery. These aren't really necessary since the flavors are already in the broth. I like to have pieces to chew while I'm eating the soup. You could just chop up the celery and carrots that were used to flavor the broth but for me, they would be too mushy so I just add more. Cook slowly for 30 minutes more until veggies are tender. 

5.
Cut any good meat off the bone and add that as well as the other pieces of ham back to soup in the last 10 minutes to heat through. Adjust seasonings to taste.

Serve with crusty rolls and enjoy!

TIP: you can do all this in a crockpot too. Layer ingredients in slow cooker in the order given; pour in water. Do not stir ingredients. Cover and cook on HIGH 4 to 5 hours or on low 8 to 10 hours until peas are very soft and ham falls off bone. Remove bone and bay leaf. Mash peas to thicken more, if desired. 

0 comments:

How to Use a Pressure Cooker

December 14, 2010 The Provident Princess 0 Comments

I think I've decided that the pressure cooker/canner is one of the best inventions ever. You can take something that usually takes forever to cook and have it done in a fraction of the normal time. My mom had a pressure cooker but gave it away when I was little after a disaster in the kitchen. So I grew up always super nervous about these mysterious pressure cookers and horror stories that seemed to follow them.

My sweet husband knew that I was getting interested in cooking more and wanting to try pressure cooking. So for Mother's Day last year he got me this pressure cooker.

It was a great idea. It is electric so it takes out a lot of the guess work and has built in safety features which make it pretty impossible to screw up. It is great for a first timer. You pretty much just push buttons and leave it alone until it beeps at you.

I thought it would be nice to do a step-by-step of the process to help you feel more comfortable with the idea and hopefully encourage you to want to try it.

Instructions
1.
Clean the cooking pot and put it inside the pressure cooker. The nice thing about this pressure cooker is that the inside pot is non-stick so it is super easy to clean up. It's like the inside bowl of a rice cooker if you have ever used one of those.

2.
Get the parts together for the lid. It comes with the outside lid, a rubber sealing ring (gasket), and a support cover for the sealing ring.

3.
Assemble the lid parts by looping the rubber ring around the support cover then pushing it through the rubber grommet (rubber piece in the middle) onto the lid.

4.
Dump your food inside. Today I am making black beans. They have already been rinsed and sorted. You can make so many things in a pressure cooker. Potatoes, artichokes, and meat roasts are all things I have tried and have been amazed at the amount of time it saves. 

5.
Dump in your water. All recipes for pressure cookers will call for a little water. The steam is what builds the pressure inside and cooks the food at such a high temperature so quickly. 

6.
Fit and twist the lid onto the cooker and add the pressure limit valve. Notice how the 2 dots line up? They need to. This is what controls the pressure. It doesn't lock into place. It just rests lightly because it needs to be able to move to release steam if the pressure gets too high. Also, this is where you manually release pressure when a recipe calls for the 'quick pressure release method'. I hold tongs and push the knob a little so I can stand far away from the hot steam that comes out.

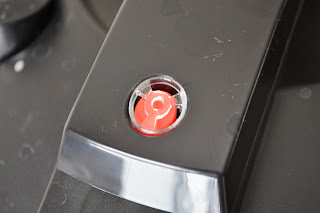
This red valve is the pressure indicator. It floats up to the top to let you know when there is pressure inside. Also, as long as the red float is up the machine will not let you unlock the lid or open it. This is one of the many safety features it has to prevent injuries. 

7.
Now's the easy part. Select High Pressure from the menu button and type in the time for how long your recipe says the food needs to cook. Unsoaked beans need 30-35 minutes. I want mine breaking apart and soft so I did 35 minutes. Hit Start.

The pressure cooker will build up pressure and once it is reached, the time will start counting down. You just need to sit back and relax with a good book.

 See how the red pressure indicator is up? This means there is pressure inside.

8. Look at your recipe and see if it needs the quick pressure release or normal pressure release method. The normal pressure release method is the easiest. Once the timer beeps letting you know the cook time is over, the machine will start to drop the pressure by itself.

You just need to wait until the red pressure indicator is down. This usually takes 20-30 minutes.

9.
 Twist off the lid and look inside. Mmm it smells so good. Some food, like beans will need to be drained. Do that now.

10. 

Your food is done! Check back next week and you'll see what I made these beans for. It's one of my favorite ways to make my food healthier.

I hope now that you know how easy pressure cooking is that you will give it a try.

Good Luck!

0 comments:

Long Term Food Storage Calculator

December 06, 2010 The Provident Princess 1 Comments

I remember when I first started getting interested in food storage. I was overwhelmed by the information. What kind of long-term food storage should I get? How much did I need per person? How would I cook it. What were some of those legumes offered? There was so much. Luckily, The Church of Jesus Christ of Latter-Day Saints has an awesome Family Home Storage program for members and non-members of the church alike.

On its website is a food storage calculator that helps you figure out exactly how much food you need per person. You can find it here. But this is a better one based from the LDS Church's Home Production and Storage manual.

Over the winter months, I'm going to be focusing more on long-term food storage since there isn't an abundant supply of fresh produce to worry about canning. And, now that the holidays are over, a lot of baking supplies go an really good sales. Especially flour and sugar. 

So, if you want to follow along and start stocking up on your food storage, take a look at the food storage calculator so you'll be ready to buy enough when you find a good deal.

1 comments:

How to Make Healing Turkey Bone Broth

November 30, 2010 The Provident Princess 0 Comments

Mmmm wasn't Thanksgiving dinner delicious? I have to say that I stuffed myself thoroughly and enjoyed every minute. Mashed potatoes and gravy are usually my favorite dish but this year my new sister-in-law made the best stuffing I have ever tasted. I had 3 helpings!

Even with how good the Thanksgiving meal is, I still can't eat the same dish day in and day out. But there is always so much food left over.

Being provident means to put all of your resources to use and let nothing go to waste. One of the things I wanted to try this Thanksgivng was to make my own turkey stock and can it for my food storage. Since it is a low acid food it needs to be pressure canned.


Any kind of stock is easy to make but pretty time intensive. Get started early in the morning and you will enjoy the delicious aroma that fills your house all day.

Ingredients
Turkey Carcass- body, wings and legs,
3 Celery stalk ribs with leaves still attached
3 Carrots, unpeeled but with the tops cut off
1 Onion, quartered with the skin still on
3 Cloves of garlic, whole
6-8 Peppercorns
2 tsp Salt
2 tsp dried thyme
1 tsp dried sage
1 bay leaf

Directions
1. 

Gather your left over turkey carcass, wings and legs. Strip all the good meat off and save it for later. Throw the carcass in a stock pot with all your vegetables. You may want to break or chop your carrots and celery in thirds to help them fit better. Make sure they are washed really well but not peeled.


 Sometimes I just use the ends of my celery instead of the long ribs. That way you can use the ribs for something else and the ends don't go to waste. Be sure to add the leaves too. They add great flavor.

2. Fill the stockpot with enough water to cover everything. Turn stove on to med-high heat.

3.

Gather your seasonings and make a bouquet garni (boo-Kay gahr-NEE). That is just a fancy word for a little bundle of herbs and spices tied in cheese cloth. I didn't have cheese cloth but I did have a ton of coffee filters laying around so I used one of those instead. Make sure that it is tied well before tossing it in the pot. The herbs are kept separate so that your broth will stay clear.


TIPS for clear broth:
  • Watch your broth. As it heats, scum/ foam will start floating to the top. It's not bad if you leave it in, but it will make your broth cloudy. If you want, skim it out of your broth as it floats to the surface. Sometimes I care and sometimes I don't.
  • If you want clear broth, DO NOT LET YOUR BROTH BOIL. If your broth is allowed to boil then the scum and fat that floats to the top will get reincorporated into the stock before you have a chance to skim it.

4. Let your stock simmer between 4-8 hrs skimming the fat off as it rises to the surface. The longer you let it simmer, the more flavor will come out of the bones and the better it will taste.

When it is done simmering, remove all the bones, vegetables, bouquet garni and strain your broth. You can either use it right away, freeze it or can it.

I kept a jar out to use right away for turkey soup and decided to can the rest.

Pressure Canning Directions
  • Fill clean, quart-size mason jars to within a 1/2 inch of the lid with broth.
  • Screw on some heated lids and bands.
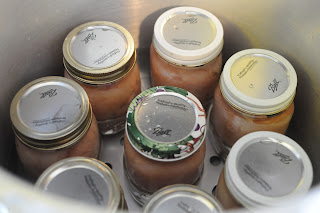
  • Arrange jars in pressure canner so that none of the jars are touching.
  • Fill canner to water line
  • Put on lid and process according to your canner's directions with venting, pounds of pressure for altitude and time. For me it was 13 lbs of pressure for 75 minutes since I was using quart jars.
  • Once processed, set jars aside to cool before dating your lids. Use your stock within 1 year.
Now you have an awesome stock to make turkey soup. If you don't want to make soup, you can use it when you make rice or other grains instead of water. Bone broth has so many healing properties, some like to just drink it plain. I would add more salt though to taste. Click here for my Beef Bone Broth recipe.

0 comments:

Tithing

November 24, 2010 The Provident Princess 0 Comments

With Thanksgiving and the Christmas Season approaching I am reminded constantly of all that I have to be thankful for.

I am thankful for my wonderful husband and all he does to make my life easier. I'm thankful for my cute daughter and how much happiness she brings to my life and the fact that I can stay at home with her. I am pregnant again and in good health. My husband has a good job which is something to be very thankful for during these scary economic times. We are in the process of buying a house. In short, I have a lot to be thankful for. Part of being thankful is having and showing gratitude to the person who is responsible for all of my blessings. In the scriptures, God asks us to give 10 percent of our income to the Church to help the poor, widows and furthering His work on the earth. I know that all good things come from God and as a way to thank Him for all he has done for me and my family we pay tithing.

I consider giving tithes to be the first rule of good finances. When setting up a budget it is very easy to become overwhelmed by the amount of things claiming a piece of the pie and think that there isn't money left for tithing.  The Bible mentions giving your 'first fruits' over 20 times. So by making tithing the first line on our budget helps remind us to keep God first in our lives and lets us acknowledge him for all that he has given us. A quote I love from Dave Ramsey is "If you cannot live off 90% of your income, then you cannot live off 100%. It does not require a miracle for you to get through the month. I think that if you sit down and look at your budget, you will see that you can make it while giving at least 10%."


Who We Are is Reflected in How We Use Our Money
God doesn't need our tithing. The law of tithing is more for our benefit and what we can learn from giving willingly. Dave Ramsey also said that "giving reminds us that the world does not revolve around us and that no matter what our financial status is, someone is in a much worse situation."

In chapter 4 of Financial Peace Revisited, Dave Ramsey speaks to the spiritual aspects of money saying "Personal Finance is who you are. The personal, philosophical, and emotional problems and strengths that you have will be reflected in your use of money. If you are very disciplined, you can be a good saver of money. If you are very selfish or self-centered, you will surround yourself with expensive toys that you cannot afford." Giving teaches us how to be unselfish people. "Unselfish people make better husbands, wives, friends, relatives, employees, and employers. God is trying to teach us how to prosper over time."

I think this is what we are all aiming for in ourselves and for our children. We want to encourage them to develop good habits and traits and to be good people. When we give, we learn to be selfless and aware of other people. When we manage our money responsibly, we learn self-confidence and independence. 

God makes this promise to us about paying our tithing in the Old Testament.

Malachi 3:10 (King James Version)
Bring ye all the tithes into the storehouse, that there may be meat in mine house, and prove me now herewith, saith the LORD of hosts, if I will not open you the windows of heaven, and pour you out a blessing, that there shall not be room enough to receive it.

Your blessings may not always come in the form of a bigger income and more wealth. It can come in the form of your money being able to stretch farther. Like getting really good deals on things that you need. Your family not being sick as much as usual, thereby reducing medical bills, or your car not breaking down. Or just learning the ability to manage your money so that you know how to provide for what you need.
I hope all of us will be able to see and appreciate all that we have been blessed with as we celebrate Thanksgiving this week. 

Happy Thanksgiving!

0 comments:

Food Storage- Nuts

November 15, 2010 The Provident Princess 0 Comments

When planning your food storage you need to store items in each of the three essential macro-nutrient categories: protein, carbohydrates, and fats.

I think storing fats/ oils is the hardest. Grains and beans/ legumes when stored properly can stay good for decades. In fact, I have heard that some archeologist found some grain in Ancient Egyptian tombs that were still able to be sprouted. That means these seed have been preserved for over 3000 years!

Unfortunately fats/oils have a pretty short shelf-life. Usually around a year or two. Even with the difficulty of keeping fats long-term, they are still essential for any food storage plan. 

I don't know if you have ever noticed the nutrition information on the back of cereal boxes. One day I was looking at one and was surprised to learn something. Each gram of carbohydrate or protein is 4 calories. But each fat gram is 9 calories. This is why oils/fats are so necessary in food storage. They pack quite a caloric punch per gram.

Most people automatically think about storing oil to cook with. That's great and you do need some for that reason. But, not all your food storage for fats need to come from oils. There are other ways to get fat into your family's diet that might even be healthier. Nuts

Nuts naturally have a high oil, protein and calorie content making them a highly prized food storage item for energy. Many are either a complete or nearly complete protein providing many essential amino acids. You have to eat both beans and rice together to make a complete protein compared to eating a handful of nuts. 

What's best about the oil in nuts is that for the most part it is made up of unsaturated fats. Unsaturated fat is the good kind that helps lower your LDL cholesterol levels keeping your heart healthy. 

Nuts are very low on the glycemic index making them ideal for people with insulin resistance problems like diabetes.They also are a good source of vitamins E and riboflavin and are high in folate, fiber, and essential minerals like magnesium, phosphorous, potassium, copper and selenium.

Nuts can be pretty expensive but there are alternatives. You can store peanut butter which is probably the most familiar to your family. Or chances are, someone in your family or neighborhood may have a nut tree and would be more than willing to let you have some for free.

 Nothing is better than free.

 I lived with a host family in Germany while I was going to college for a semester and I remember my host mom coming home one day with a bag of hazelnuts. I'd never seen hazelnuts still in their nut and needing to be cracked before. I found out that she had just gathered them off the ground from one of the schools nearby that a had a few hazelnut trees. The idea of actually getting nuts from a wild tree and eating them was such a foreign concept to me. I always just thought nuts came from the store in a bag. 

Now I know better. And in fact, my brother-in-law's family has a walnut tree. 

So for the past few years my sister-in-law gets him to gather me a box full of nuts for my food storage. 

Because of their high oil content, nuts will go rancid pretty quickly if just left on the shelf. You can dry roast them in your oven to make them last longer. The great thing about nuts, is that once they are cracked you can just bag them up and stick them in the freezer to enjoy for years.

They are such an easy way to get a little more nutrition in your diet. You can put nuts on salads, stick them in cookies and breads. I even pull out a few each morning to put in my oatmeal to make it more nutritious.

Sunflower seeds are an easy thing to add to your food storage because you can grow them yourself. I want to try that this year. Has anyone ever grown and collected their own sunflower seeds before and have any tips to share? 


0 comments:

How to Can Ground Beef

November 10, 2010 The Provident Princess 0 Comments

I've been so busy that I haven't felt like posting lately. I have been canning though, I assure you. I've been keeping my eye on the price of ground beef for a while now and finally one of my grocery stores had it for $1.49/lb.
I hadn't ever canned ground beef before but I was looking forward to it since my chicken turned out to be so easy. 

Let's get started
Prep work. 
  • Make sure your jars are clean.
  • Start warming your jar lids on the stove. Do not boil, you just want the rubber rings to be gummy.

1. Get your meat. 
Usually you want to get the leanest meat you can. Canning it makes it super moist so it's a great way to use the less expensive cuts of meat and still have them be really juicy. The stuff on sale at my store was only 73% lean though so I made some alterations to the precooking process.

2.
Working in batches, brown meat. It took me about 3 batches to brown 5 lbs. I only did 5 lbs at a time because I changed the recipe for the next 5 lbs. And it is way less intimidating that way.

You don't have to brown your meat all the way, it's just for texture when you open the can. Some people don't like it really soft so the browning gives it some definition. As my meat was getting done, I would drain it, then stick it in a stock pot with a little water on low heat to keep it warm. 

Also, here's a little trick I learned about browning ground beef in Chemistry. If you stick a little water in the pan while it browns, the fat and the water don't like each other and the water keeps the fat from reabsorbing into the meat. Sticking the meat into the stockpot works the same way. That is why I wasn't too worried about using a fattier package of ground beef than usual. 

3.
When each batch of meat is almost done, dump some onions in the pan to cook a bit. You don't want them in there too long because they have enough time to cook in the pressure canner. You just want to mix them evenly in with the meat. I used about 1/2 and onion per pound of meat.

4.
Line up your clean jars and using a funnel, carefully spoon your meat into the jars. About 1 lb of beef fits into each pint sized jar. You need about 1 1/4 inches of head space because the ground beef won't expand like the chicken did since it is already cooked.

5.
But, because I'm not putting the meat in raw like I did the chicken breasts, the meat won't make enough of its own juice so I need to add some. This is some of the water from the stock pot that held the beef. It turned into a mild beef broth that I used to fill my jars with. I just used my gravy separator (which by the way, I love!) to make sure I didn't put any fat back in. Fill the jars to cover all the meat, keeping in mind your head space. As you pour, take a rubber (or non-metallic) spatula and work out any air bubbles that might be in the meat.

Option 2. 
On my second batch of ground beef, I used tomato sauce to fill my jars with. These jars I'm planning on using in spaghetti, sloppy joes, chili or anything that I would normally end up putting tomato sauce in anyway. This way the meat is already flavored. I watered it down by a ratio of 1:1 to make it easier to pour.

6.
If you want your meat seasoned a little bit more, put 1 tsp of pickling salt in each pint. The flavor will mix as it is in the pressure canner. Make sure only to use pickling salt. Regular table salt will make your jars turn foggy. You could also just put 1 tsp of  beef bouillon in instead.

7.
Make sure to wipe the rims of your jars really well with a hot, clean towel. You don't want any grease on the rim to prevent your lids from sealing.

8.
You are ready to put the lids on the jars. Use a magnetic lid lifter to avoid burning yourself. I've don't this one too many times when trying to just use a fork to lift them.


9.
Put your jars in your pressure canner, and follow the instructions that came with it for pressure and timing based on altitude. This is the Presto 1781 23-Quart Aluminum Pressure Cooker/Canner. For ground beef pints at my altitude I used 13 lbs of pressure for 75 min. For a step by step process in pressure canning check out my post on canning chicken

10. Ta Da!

So they might not be the prettiest looking jars of food, but believe me, it tastes fantastic. The tiny bit of congealed fat at the top is totally normal. I made tacos out of my first jar and no joke it was exactly like the taco meat you get at Taco Bell. Mmmm so good! I'm very happy with how it turned out. 

Don't forget to label your jars! This meat will stay good for a year or longer. If you have a jar that didn't seal, just stick it in the fridge and use it soon. It's fun to see how your meat turned out anyway.

As with any canned meat, the USDA recommends boiling/ heating the meat for 10 minutes once it is opened just to make sure all bacteria is killed.

Ground beef is one of the things I'd been wanting to try canning for a long time. I'm glad I finally did it and am happy to post about it. I'd love to hear some of the things you've been wanting to try too. 

Happy Canning

0 comments:

How to Can Homemade Grape Juice

November 04, 2010 The Provident Princess 1 Comments

One of my earliest memories is of my preschool teacher taking my class on a field trip where we made grape juice. I can't remember much about it except for the divine smell of the ripe Concords hanging on their vines and the satisfying experience of being able to sample the sweet product of our efforts. I will never forget the rich flavor and the sweet taste left on my tongue.

I've kept this memory for over 20 years never again experiencing grape juice that could compare to that of my preschool field trip. My husband thinks it's sad that I can remember things like this. But for some reason food leaves a lasting impression on me.

Imagine my surprise 2 years ago when I was coming back from a walk in the new neighborhood my husband and I had just moved into when I got a whiff of it. I looked around, took a few more deep breaths of the crisp autumn air and I was certain. 

Grapes, and not just any grapes, my preschool grapes were somewhere nearby. A little investigation proved that they happened to be along the fence of my new next-door neighbor. This was the beginning. I had never canned anything before, but at that moment I knew I needed to have grape juice from those grapes. 

Over the next few weeks I began hatching a plan to convince my new neighbor to give me her grapes. Luckily, it didn't take any master planning. One day, I mentioned how great they smelled. She told me there were more than enough for what she wanted so would I like the rest? oh and would I like her to teach me how to can the grape juice too? Music to my ears. 

So I jumped right in, got some old mason jars from my mom and the result was everything I could have wished for. Smooth, rich, sweet chilled concord bliss.

3 years later, I still can hardly wait for the first frost to come so the grapes will be ready to pick. My mom even caught the bug last year after tasting the end result. (The first year I felt like I had to ration my jars but the next year I was less stingy). My mom has always made her own jelly but last summer she drove all over the valley collecting people's unwanted concord grapes and ending up canning over 100 quarts of grape juice!

I recommend starting small. Let's start with one batch. Oh and by-the-way, it is soooo much easier if you can get your hands on a steam juicer. It's possible to make grape juice in a stock pot, but then you have to worry about straining the juice through cheesecloth. With a steam juicer, it does all the work for you.

Go pick some grapes, you might be surprised how many old neighborhoods have grapes that no one wants. So ask around. If all else fails, you can buy some. The key to good grape juice though is to only use Concords. The lighter red and white varieties just won't provide the flavor needed to make a yummy juice they will turn out too sweet.


Wash and de-stem the grapes. Put as many into the steamer as will fit with the lid on. For the steamer I use, one full batch will make enough juice for 5-6 quarts.


Assemble steamer. Turn your stove to high heat and steam the grapes. The skins will begin to burst and release their juices.

You can check how much juice you have buy lifting up the top portion of the juicer to see how high the juice is in the reservoir.


Start heating your new lids and sterilizing your bottles. Do not boil your lids, you just need to soften the gummy seal by warming them up. The grape steaming process takes from 30 min to 1 hour.

Line up your sterilized bottles so they are easy to get to.

Once your juice is almost to the top of the reservoir and you are ready to fill your jars, carefully place a bottle with a funnel one under the spout hose and release the clamp. Obvious but necessary warning: the liquid coming out of the steamer is boiling hot. Hold the jar with a towel so you don't burn yourself as the bottle fills up. Leave 3/4- 1 inch head space. (I usually dump my first jar back into the steamer over the grapes. I think it helps the top layer of grapes breakdown and evens out the flavor.)

Wipe the rim of your jar with a wet, hot rag or paper towel. Grab on of your warm lids with a magnetic lid lifter and place on jar with metal band.


Screw on until finger tight. You don't need to, nor should you go crazy and try to screw them on as tight as they will go. Finger tight is fine. Set aside to cool and repeat til all juice is gone. You can strain the remaining grape flesh over a bowl and get almost a full quart before tossing the pulp in the garbage. You can add that juice to your next batch and can it with those bottles, or you can heat to boiling and can it individually if you are only going to make 1 batch.

Mmm... don't they look delectable? Stick one in the fridge right away and you'll know what I mean. Sweet childhood memories just as I remembered.

1 comments:

How to Can Chicken

October 27, 2010 The Provident Princess 1 Comments

I love canning. I love that I know exactly what is going into the food I feed my family. And, I love making use of a good deal. I don't know if it is just the accountant in me, but I love knowing that I am saving money. 

One of my sisters-in-law invited me to a home canning presentation over the summer where I tasted home-canned meats for the first time. They were so good. So juicy, great flavor. Since then, I've been wanting to try canning meat. I was a little intimidated by the fact that you have to use a pressure canner. Water bath canners cannot get hot enough to kill all of the bacteria in the food. 


I put it off until one of my grocery stores had a deal on boneless, skinless chicken that I couldn't resist. I ended up buying 15 lbs.

I was surprised by how easy it was. You need to follow the instructions that come with your pressure canner. They can vary slightly, but sometimes it's nice just to see the process.

The nice thing about canning meat is that you can put it in the jars raw. They cook in the pressure canner for so long that there is no need to cook beforehand.

Directions
Prep work. 
  • Make sure all your mason jars are clean. Technically, you don't need to sterilize them because the pressure canner cooks them at such a high temperature that they get sterilized then. I still sterilize them beforehand though, I guess I'm just paranoid.
  • Warm your jar lids in water to get the gummy rings softened. Do not boil.

1.
Get your chicken and cut off any visible fat. You can put the chicken in as whole breasts but I wanted to slice mine into tenders. That way I figured I could reduce air bubbles. I sliced my chicken and seasoned with a little pepper as I went. You don't need to season them if you don't want to though.

2.
Stuff your raw chicken into clean mason jars. 1 pint jar holds about 1 pound. Leave 1 1/4 inch head space. The chicken will release its juices as it cooks and you don't want it to touch the lids or it might make them not seal.

               
I put chicken base Better than Bouillon in my jars. It just intensifies the flavor of the chicken as it cooks.You can use a bouillon cube or powder instead if you want.

3.
Wipe all your jars with a hot towel to remove any chicken juices that might've gotten on the rim. Use a magnetic lid lifter to lift lids out of hot water and place on jars. Screw rings on til finger tight. They have to be able to release some air so don't screw them on ridiculously tight.

4.
Place jars on rack in the pressure canner making sure that they don't touch. They need to be on the rack so they don't touch the bottom of the canner directly and get too hot. Follow pressure canner instructions for amount of water to fill. Usually there is a line on the canner that shows you how much. About 11/2-2 inches.

5.
Place lid on your pressure canner following directions from manual. I'm using the Presto 1781 23-Quart Aluminum Pressure Cooker/Canner. Turn to high heat. Vent steam for 10 minutes. Place on vent block and bring to pressure depending on altitude. Once pressure is reached cook for 75 minutes for pints. Slowly turn down the temperature as it builds pressure until it is just right. You need to babysit the canner to make sure that the temperature doesn't drop below what you are supposed to can it at or you will have to bring it to pressure again and start the time all over. It isn't as hard as it sounds. You can find a setting on your stove where it will hover around the right temperature without building or losing pressure. For me, it was on 4. If you have a gas stove it is much more precise.

6. Once the 75 min are up, remove the canner from heat and let it slowly release pressure. You do not need to do anything, this happens naturally as it begins to cool. Once the pressure gauge reads zero and the pressure indicator drops, you can take off the lids, and remove jars. Place them on a towel to cool. 

7. Don't forget to label your jars. Canned chicken will last for over a year, but I doubt you will be able to wait. I made Chicken Enchiladas with the chicken and my husband without knowing that I used my canned chicken declared them my best yet! He was nervous about me canning meat because he was afraid of how it would taste so I didn't tell him til he'd already eaten it. Tricky, tricky, I know.

ENJOY!

When I first opened the can, I tasted it to see how it turned out. It smell and tasted just like the canned chicken you can get at the store. I buy that usually just for making chicken salad sandwiches but with your canned chicken, you can use it to make anything you usually need shredded chicken or chicken chunks for. And it is so easy to shred. I basically just pressed my fork against it and it fell apart. 

It is recommended to heat/boil canned meats for 10 min after opening just to make sure that any bacteria is killed. If you are going to use it in a casserole or other dish that needs to be heated anyway, I don't bother with preheating, I figure it gets hot enough for long enough while cooking.

1 comments: